The security of online store is as important as the security of a physical store. The rise of e-commerce platforms like Magento has brought with it an increase in cyber threats, with brute force attacks being one of the most prevalent. Once hackers gain access to your Magento site, they can wreak havoc on your business, stealing sensitive customer data, disrupting your operations, and damaging your reputation.
According to recent research by Abnormal Security, brute force attacks have seen a staggering increase of 671%, targeting a quarter of all companies on a weekly basis. This alarming rise emphasizes the importance of securing your Magento store against such attacks.
But fear not; there are effective strategies to prevent brute force attacks in your Magento store. This article will guide you through understanding what brute force attacks are, how they can impact your Magento store, and, most importantly, how you can protect your store against them.
What is a Brute Force Attack?
A brute force attack is a popular cracking method that involves ‘guessing’ usernames and passwords to gain unauthorized access to a system. By some accounts, brute force attacks accounted for 5% of confirmed security breaches. These attacks can be carried out manually, but almost all brute force attacks today are performed by bots.
Attackers have lists of commonly used credentials, or real user credentials, obtained via security breaches or the dark web. Bots systematically attack websites and try these lists of credentials, and notify the attacker when they gain access.
Potential Impact of a Successful Brute Force Attack in Magento 2
A successful brute force attack can have a domino effect on your Magento 2 store. The immediate impact is unauthorized access to your admin panel, which can lead to a plethora of potential issues. The attacker can gain access to sensitive customer data, manipulate product listings, alter pricing, and even take control of your entire store.
Moreover, the attacker can inject malicious code into your Magento store, turning it into a platform for distributing malware to your customers. This can severely damage your brand’s reputation, leading to a loss of customer trust and potential legal repercussions.
Financial Impact
The financial impact of a brute force attack can be devastating. According to a report by IBM, the global average data breach cost in 2023 was $4.45 million. This includes the direct costs of addressing the breach and indirect costs such as loss of business due to damaged reputation.
SEO Impact
Search engines like Google take website security seriously. If your Magento store is compromised, it can lead to a drop in search engine rankings. In severe cases, Google might even blacklist your site, causing a significant drop in organic traffic.
Read Expert Magento SEO Tips and Practices
Compliance Violations
If you’re subject to regulations like the GDPR or PCI DSS, a brute force attack leading to a data breach can result in hefty fines. For instance, under the GDPR, fines can reach up to 4% of a company’s annual global turnover or €20 million, whichever is higher.
How Can You Detect a Brute Force Attack in Magento?
Detecting a brute force attack can be challenging, as the signs can often be subtle. However, there are a few key indicators that can help in identifying vulnerable functionality in Magento:
- Multiple Failed Login Attempts: A sudden increase in failed login attempts can be a clear sign of a brute force attack. Hackers often use automated software to try various password combinations, leading to numerous unsuccessful logins.
- Unexpected Account Lockouts: If legitimate users are reporting unexpected account lockouts, this could be due to a hacker making multiple incorrect password attempts.
- Unusual Traffic Patterns: A sudden spike in traffic, especially from a single IP address or range of IP addresses, can indicate a brute force attack.
- Slow Website Performance: Brute force attacks can consume significant server resources, leading to slow website performance or even downtime.
Tools and Techniques to Detect Brute Force Attacks
Detecting a brute force attack requires constant vigilance and the right tools. Here are some techniques and tools you can use:
- Audit Logs: Regularly checking your Magento audit logs can help you spot unusual activity, such as multiple failed login attempts from the same IP address.
- Security Plugins: There are numerous security plugins available for Magento that can help detect and prevent brute force attacks. These plugins can monitor login attempts, block suspicious IP addresses, and even enforce strong password policies.
- Web Application Firewalls (WAFs): A WAF can help protect your Magento store by monitoring HTTP traffic and blocking suspicious activity. Some WAFs can even detect and prevent brute force attacks.
- Penetration Testing Tools: Tools like BruteX and Disreach can help you test your system’s robustness against brute force attacks. These tools systematically generate many possible passwords to check your system’s strength.
General Practices to Prevent Brute Force Attacks on Magento 2
1. Use strong, unique passwords
A strong, complex password can significantly increase the time and computational power required for an attacker to guess it correctly, making your Magento store a less attractive target.
Tips for Creating Strong Passwords
- Use a Combination of Characters: Include a mix of uppercase and lowercase letters, numbers, and special characters. This diversity makes your password harder to guess.
- Go for Length: Longer passwords are more secure. Aim for a password that’s at least 12 characters long.
- Avoid Personal Information: Information that’s easily linked to you, like your name, birth date, or address, should be avoided.
- Don’t Use Common Words: Password cracking tools often use dictionaries to guess passwords. Using common words makes your password easier to crack.
- Change Your Passwords Regularly: Regularly updating your passwords and resetting password functionality can help keep your accounts secure, even if a hacker has gained access.
- Use a Password Manager: Remembering complex passwords can be challenging. A password manager can generate and store strong passwords for you.
2. Enable Two Factor Authentication (2FA)
Implementing 2FA significantly reduces the chances of a successful brute force attack. Even if a hacker manages to guess a user’s password, they would still need a second form of identification to gain access. This is usually a temporary code sent to the user’s mobile device, which is nearly impossible for a hacker to obtain.
Read, How to Implement Two-Factor Authentication in Magento 2?
3. Limit Login Attempts
Magento 2 provides a built-in feature that allows you to set the maximum number of login attempts before an account is locked. Limiting the number of login attempts can effectively stop brute force attack, as the account will be locked after a certain number of failed attempts.
Steps to Limit Login Attempts in Magento 2
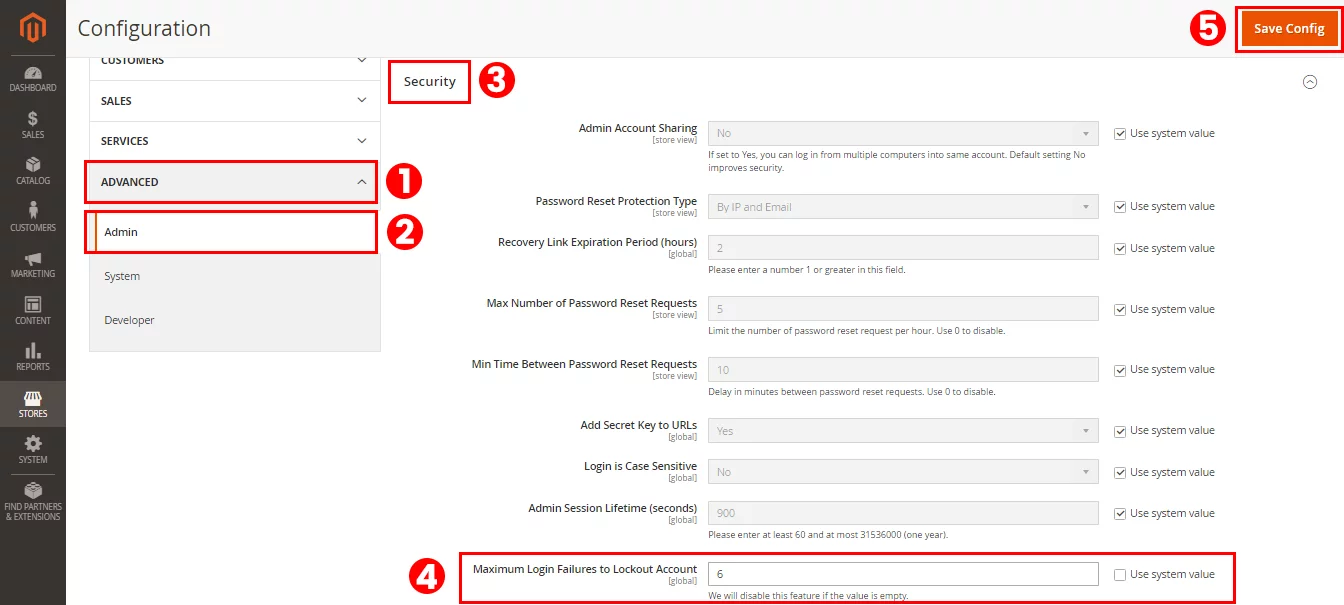
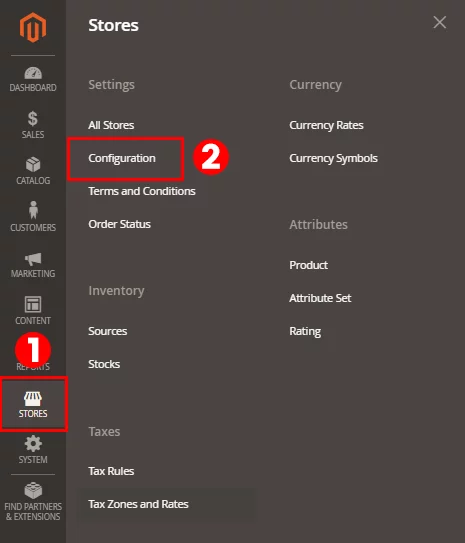
- Navigate to Stores: Go to the ‘Stores’ option from your Magento admin panel.
- Access Configuration: Select’ Configuration’ under the ‘Stores’ menu.

- Go to Advanced Admin: In the ‘Configuration’ panel, navigate to the ‘Advanced’ section and then select ‘Admin’.
- Expand the Security Section: In the ‘Admin’ panel, expand the ‘Security’ section.
- Set Maximum Login Failures: Here, you’ll find an option labeled ‘Maximum Login Failures to Lockout Account’. You can set this to any number you prefer. For example, you might want to set it to 3, a common practice on many websites. Finally, Click on ‘Save Config’.
 ‘Admin’ > ‘Security’ to set login attempt limits.”>

 ‘Admin’ > ‘Security’ to set login attempt limits.”>
By default, Magento 2 allows for 6 login attempts before locking an account. You can leave this field empty if you want to allow unlimited attempts. However, for the sake of security, it’s recommended to limit the number of login attempts.
4. Monitor and block suspicious IP addresses
Monitoring and blocking suspicious IP addresses is a proactive approach to security. It allows you to identify potential threats before they can cause harm. By keeping an eye on the IP addresses accessing your store, you can spot unusual patterns or repeated attempts to access your store from a single IP address. These could be signs of a brute force attack or other malicious activities.
Steps to Monitor and Block Suspicious IP Addresses in Magento 2
- Identify Suspicious IP Addresses: Keep an eye on your server logs to identify any IP addresses that are making repeated attempts to access your store. Look for patterns such as multiple failed login attempts or unusual activity.
- Block Suspicious IP Addresses: Once you’ve identified a suspicious IP address, you can block it. In Magento 2, you can do this by navigating to the ‘System’ menu, then ‘Permissions’, and finally ‘Block IP’. Here, you can add the IP address you want to block.
- Monitor Your Store Regularly: Regular monitoring is key to maintaining your store’s security. Make sure to check your server logs regularly to spot any suspicious activity.
- Use Security Extensions: There are several security extensions available for Magento 2 that can help you monitor and block suspicious IP addresses. For example, the Mageplaza 2 Security extension offers features like IP whitelisting and blacklisting, login attempt tracking, and more.
5. Keep Magento and Extensions Up to Date
Each new version of Magento and its extensions comes with security patches that fix vulnerabilities identified in previous versions. By updating, you ensure your store is protected against known threats.
How to Update Magento and Extensions
Updating Magento 2 Extensions via FTP/SSH
If you have an extension on your Magento 2, you can manually update the module by following these steps:
- Connect to the root of your Magento 2 installation (the folder that contains the extension folder) via SSH.
- Remove the module files using the command:
cd app/code/<VendorName>/andrm -rf <ComponentName> - Update the module to its latest version by putting the code module into
app/code/<ExtensionProvider>/<ExtensionName>. You can find<VendorName>/<ComponentName>in the file composer.json. - Install the updated module by applying the following commands:
php bin/magento setup:upgrade,php bin/magento setup:static-content:deploy, andphp bin/magento cache:flush. - Check the functionality of the module to ensure that it’s working correctly after the update.
Updating Magento 2 Extensions via Composer
The extension update process via Composer is the same as the module installation process. To update the extension, simply execute the command: composer update <composer_name>
Instead of the <composer_name>, please specify the corresponding module name which is indicated in your customer account. This command updates only the last two version numbers: e.g., 1.x.x (only x.x will be updated).
To update the version from 1.x.x to 2.x.x, you need to execute the following command:
composer require <composer_name> ^x.0.0 –update-with-dependencies
Where x corresponds to the first version number. For example, to update the Improved Layered Navigation Extension for M2 from the 1.x.x version to the 2.x.x version, you need to execute the command:
composer require bsscommerce/defer-js ^2.0.0 –update-with-dependencies
6. Secure Secret Links
For machine-readable secrets that use randomly generated strings, such as authorization tokens or a secret link to a shared document, it’s important to use a safe hashing algorithm and cryptographically secure randomizers.
7. Human Readable Secrets
Human-readable secrets require a different approach. While it’s important to encourage users to use complex passwords, it’s equally important to store these passwords securely. Magento 2 uses a strong hashing algorithm (SHA-256) for password storage, which provides a good level of security. However, it’s also crucial to educate users about the importance of using unique and complex passwords to further enhance security.
Admin Panel Practices to Prevent Brute Force Attacks on Magento 2
8. Change the default admin URL
The admin panel URL is the gateway to your Magento store’s backend, where all the critical operations like product management, order processing, and customer management take place. By default, Magento sets the admin URL as your-domain.com/admin. This default URL is common knowledge, making it an easy target for brute force attacks.
Changing the default admin account URL to something unique and less predictable can significantly reduce the risk of unauthorized admin access.
How to Create a Custom Admin URL from the Magento Admin
- Log in to the Admin panel, then navigate to Stores > Settings > Configuration. ‘Configuration’ for setting a custom admin URL.”>
- Look for the Advanced section in the left panel and select Admin.
 ‘Admin’ within ‘Configuration’ to set a custom admin URL”>
 - Expand the Admin Base URL selection for setting up the custom URL.
- On the Admin Base URL, do the following steps:
- Choose Use Custom Admin URL = Yes. Then enter your Custom Admin URL in the format: http://yourdomain.com/magento/
- Set Custom Admin Path = Yes. And fill in the Custom Admin Path that’s appended to the Custom Admin URL. Your custom path will be after the “/” slash in your URL above.

- Once completed, click on the Save Configuration button to save all your changes. You can now try to log out of your Magento account and log in again using the new URL.
 ‘Configuration’ for setting a custom admin URL.”>
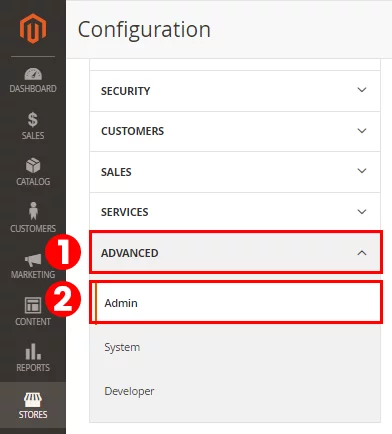 ‘Admin’ within ‘Configuration’ to set a custom admin URL”>
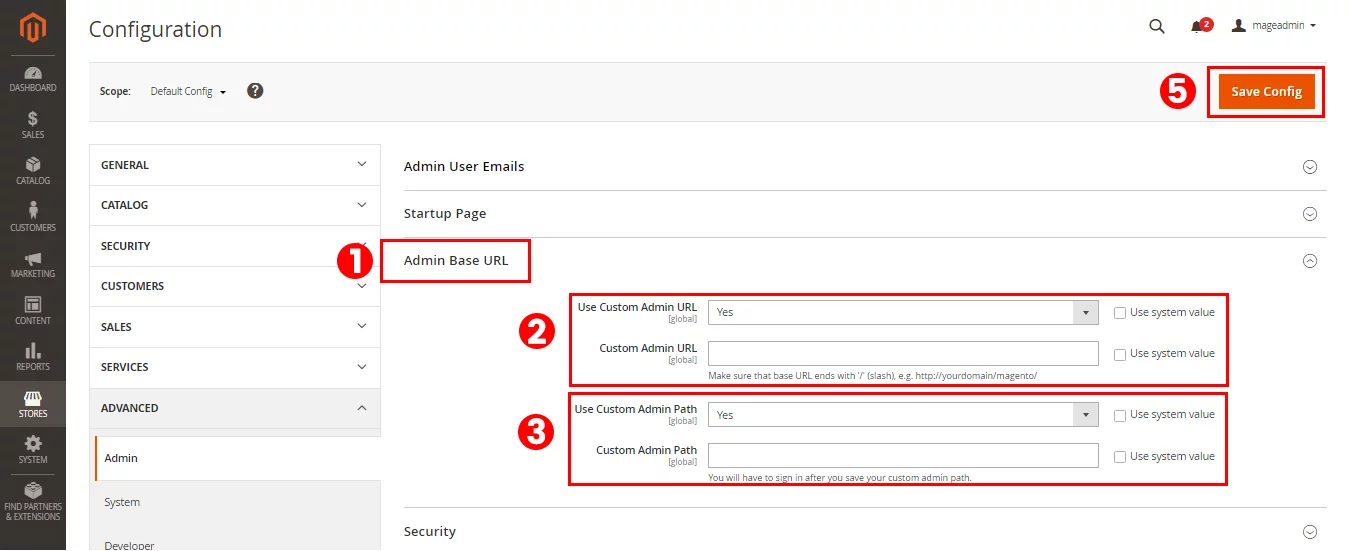
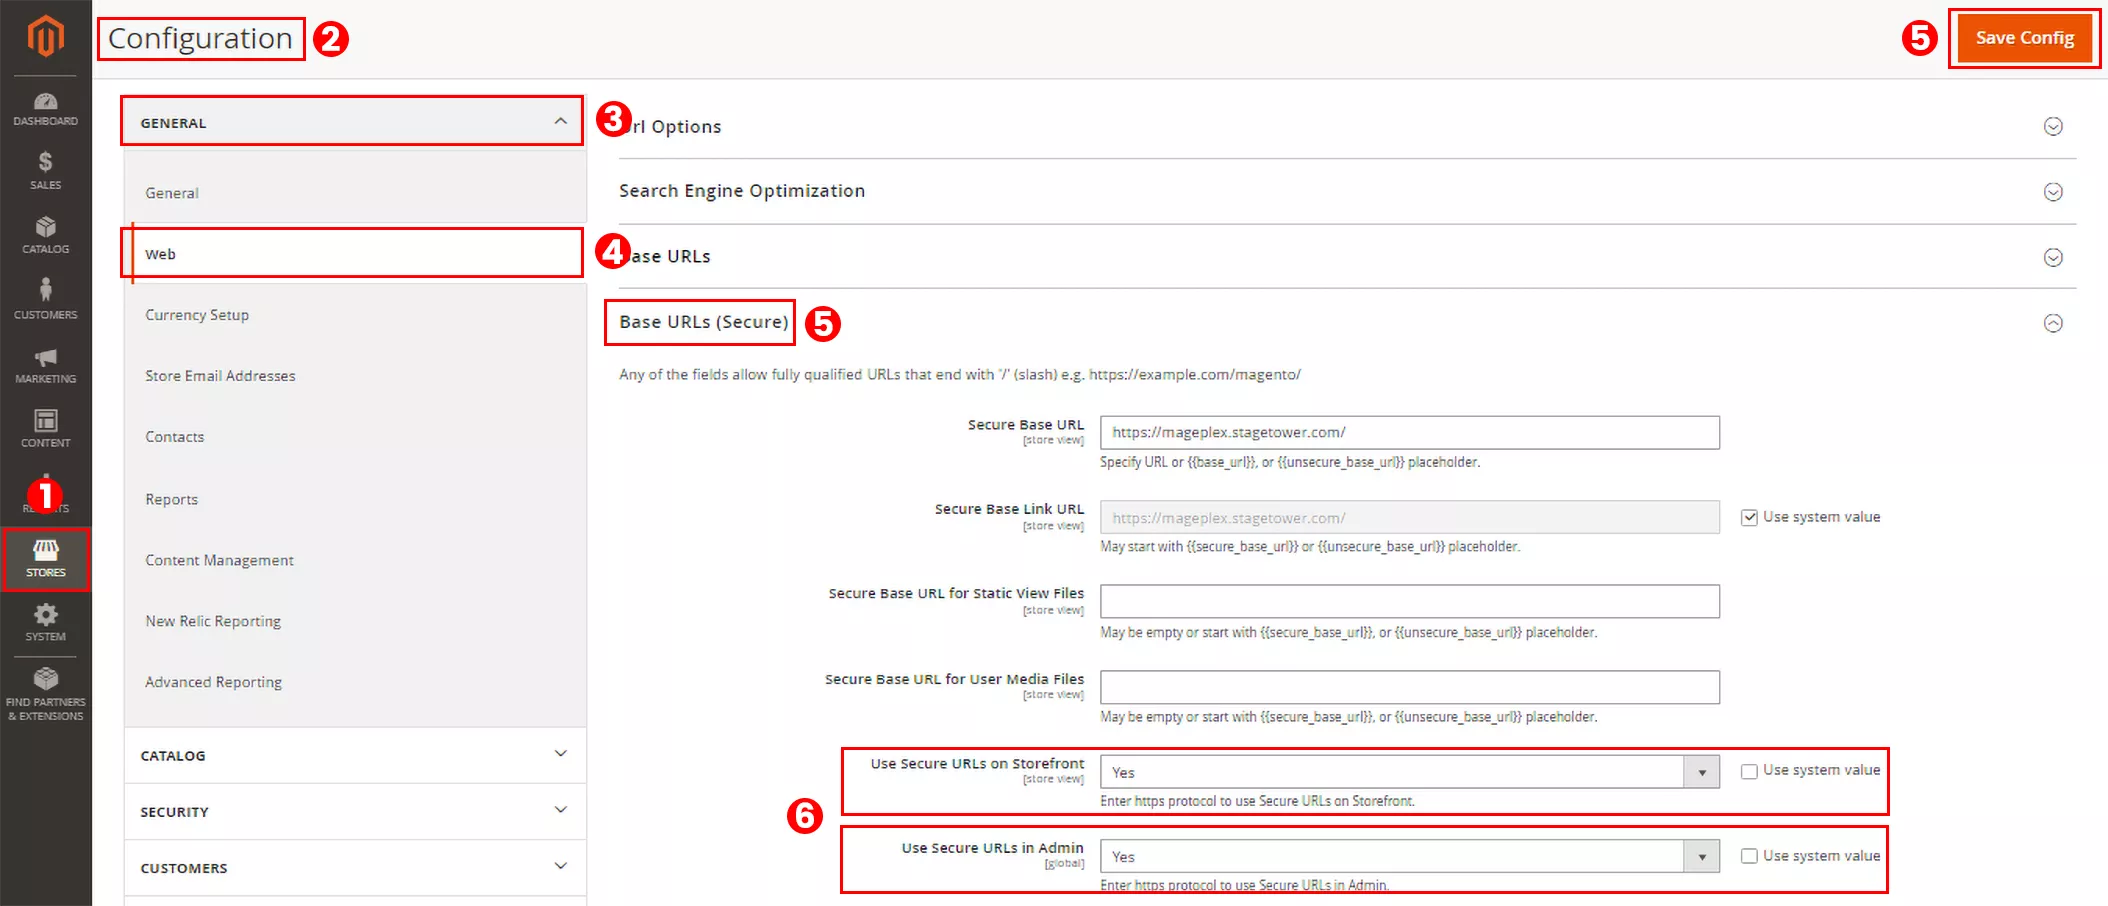
9. Enable HTTPS for secure connections
One of the most effective ways to enhance your store’s security is by enabling HTTPS for secure connections from the admin panel. HTTPS, or Hyper Text Transfer Protocol Secure, is the secure version of HTTP. It means all communications between your browser and the website are encrypted, providing a secure way to transmit sensitive information.
Here are steps to enable HTTPS for secure connections from the admin panel in Magento 2:
Step 1: Obtain an SSL Certificate
Before you can enable HTTPS, you need to obtain an SSL (Secure Sockets Layer) certificate. This digital certificate authenticates the identity of your website and encrypts the data sent to the server. You can purchase an SSL certificate from a Certificate Authority (CA) or use a free one from Let’s Encrypt.
Step 2: Install the SSL Certificate
After obtaining the SSL certificate, install it on your server. The installation process may vary depending on your hosting provider. If you’re unsure how to do this, contact your hosting provider for assistance.
Step 3: Configure Magento to Use HTTPS
Once the SSL certificate is installed, you can configure Magento to use HTTPS. Follow these steps:
- Log in to your Magento admin panel.
- Navigate to Stores > Configuration > General > Web.
- Set “Use Secure URLs on Storefront” and “Use Secure URLs in Admin” to “Yes”.
- Save the configuration.

Step 4: Force HTTPS in Magento
To force HTTPS in Magento, you can modify the .htaccess file. Add the following lines to the end of your .htaccess file:
RewriteEngine On
RewriteCond %{HTTPS} off
RewriteRule ^(.*)$ https://%{HTTP_HOST}%{REQUEST_URI} [L,R=301]
This will redirect all HTTP requests to HTTPS, ensuring that all connections to your Magento store are secure.
Step 5: Verify the HTTPS Configuration
Finally, verify that HTTPS is working correctly. You can do this by accessing your Magento store via the HTTPS URL. If the SSL certificate is installed correctly, you should see a padlock icon in the address bar of your browser.
10. Implement IP Whitelisting for Access to the Admin Panel
One way to mitigate brute force attacks on your Magento 2 store is by implementing IP whitelisting for access to the admin panel. This method allows only specific IP addresses to access your admin panel, adding an extra layer of protection against unauthorized access. Let’s walk through the steps to set this up:
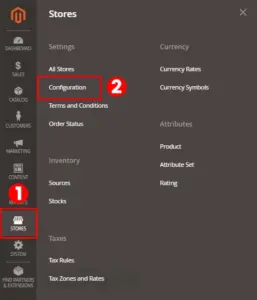
Step 1: Login to Magento Admin Panel
Start by logging into your Magento Admin Panel. Once you’re in, navigate to the sidebar and select ‘Store’ > ‘Settings’ > ‘Configuration’.
Step 2: Navigate to Developer Settings
From the sidebar, go to ‘Advanced’ > ‘Developer’. This will take you to the developer settings, where you can manage various aspects of your Magento store’s functionality.
Step 3: Expand Developer Client Restrictions
Look for the ‘Developer Client Restrictions’ section and expand it. This section contains settings related to client restrictions, including IP whitelisting.
Step 4: Add IP Address to Whitelist
In the ‘Allow IPs’ field, enter the IP address that you want to whitelist. If you need to whitelist multiple IP addresses, simply separate each one with a comma. This will ensure that only devices with these IP addresses can access your Magento admin panel.
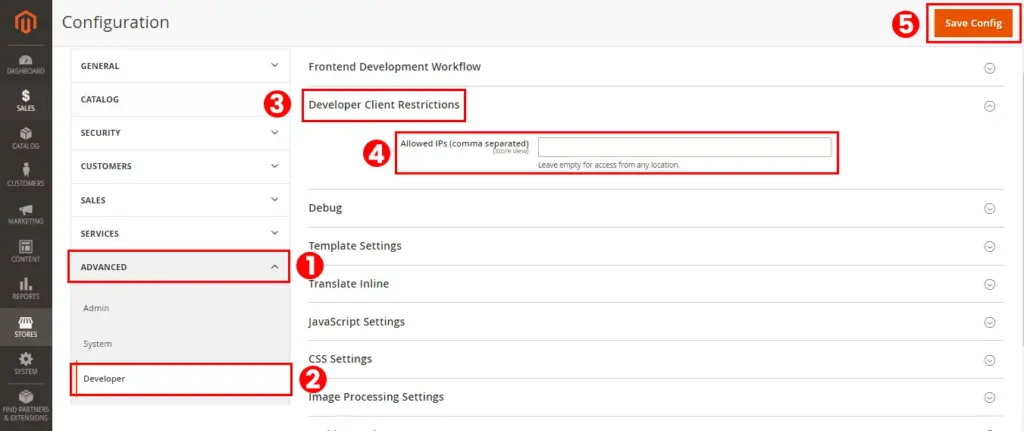
Step 5: Save Your Changes
Once you’ve entered all the IP addresses you want to whitelist, click on the ‘Save Config’ button. This will save your changes and implement the IP whitelisting.
11. Use CAPTCHA to Prevent Automated Login Attempts
Verifying that a client is a real person is a highly effective way to prevent scripts from automatically guessing secrets. You provide the client with a problem that requires the problem-solving skills of a human. CAPTCHA is a powerful tool that helps ensure that it’s a human, not a bot, interacting with your site. It’s an acronym for Completely Automated Public Turing test to tell Computers and Humans Apart. Magento 2 supports the standard CAPTCHA and Google reCAPTCHA.
Here’s how you can enable CAPTCHA in your Magento 2 settings:
Enabling CAPTCHA for the Admin
- On the Admin sidebar, navigate to Stores > Settings > Configuration.
- In the left panel, expand Advanced and choose Admin.
- In the upper-right corner, set Store View to Default.
- Expand the CAPTCHA section.
- Set Enable CAPTCHA in Admin to Yes. Then complete the remaining options as follows:
- Enter the name of the Font to be used for CAPTCHA symbols (default: LinLibertine).
- Select the forms where the CAPTCHA is to be used.
- Set Displaying Modes to one of the following:
- Always — CAPTCHA is always required to log in to the Admin.
- After number of attempts to login — This option applies only to the Admin Login form. When selected, the Number of Unsuccessful Attempts to Login field appears. Enter the number of login attempts that you want to allow. A value of 0 (zero) is similar to setting Displaying Mode to Always.
- For Number of Unsuccessful Attempts to Login, enter the number of times the administrator can try to log in before the CAPTCHA appears. If set to zero (0), CAPTCHA is always required.
- For CAPTCHA Timeout (minutes), enter the number of minutes before the CAPTCHA expires. When the CAPTCHA expires, the administrator must reload the page.
- Enter the Number of Symbols to appear in the CAPTCHA. Up to eight (8) symbols can be used. For a variable number of symbols that changes with each CAPTCHA, enter a range (such as 5-8).
- For Symbols Used in CAPTCHA, enter the letters (a-z and A-Z) and numbers (0-9) that you want to appear randomly in the CAPTCHA.
- Set Case Sensitive to Yes if you want to require administrators to enter the characters in upper or lowercase exactly as shown in the CAPTCHA.
- When complete, click Save Config.
Enabling CAPTCHA for the Storefront
- On the Admin sidebar, navigate to Stores > Settings > Configuration.
- In the left panel, expand Customers and choose Customer Configuration.
- Expand the CAPTCHA section.
- Set Enable CAPTCHA on Storefront to Yes. Then complete the remaining options as follows:
- Enter the name of the Font to be used for the CAPTCHA symbols (default: LinLibertine).
- Select the forms where the CAPTCHA is to be used.
- Set Displaying Mode to one of the following:
- Always — CAPTCHA is always required to access the selected forms.
- After number of attempts to login — Enter the number of login attempts before the CAPTCHA appears. A value of 0 (zero) is similar to “Always.”
- For Number of Unsuccessful Attempts to Login, enter the number of times a customer can log in unsuccessfully before the CAPTCHA appears. If set to zero (0), CAPTCHA is always used.
- For CAPTCHA Timeout (minutes), enter the number of minutes before the CAPTCHA expires. When the CAPTCHA expires, the customer must reload the page to generate a new CAPTCHA.
- Enter the Number of Symbols to appear in the CAPTCHA. Up to eight (8) symbols can be used. For a variable number of symbols that changes with each CAPTCHA, enter a range (such as 5-8).
- For Symbols Used in CAPTCHA, enter the letters (a-z and A-Z) and numbers (0-9) that you want to appear randomly in the CAPTCHA.
- Set Case Sensitive to Yes if you want to require customers to enter the characters in upper- or lowercase exactly as shown in the CAPTCHA.
- When complete, click Save Config.
By following these steps, you can enable CAPTCHA in your Magento 2 store, adding an extra layer of security against such an attack. This way, legitimate users occasionally solve a simple CAPTCHA, ensuring they are human, while bots are kept at bay.
XML File Practices to Prevent Brute Force Attacks on Magento 2
12. Protect local.xml file
Here’s how you can protect the local.xml file in Magento 2:
- Locate the .htaccess File: The .htaccess file is usually located in the root directory of your Magento installation. If you can’t find it, check if your FTP client is set to show hidden files.
- Edit the .htaccess File: Open the .htaccess file in a text editor. You’re going to add some code to this file to protect your local.xml file.
- Add the Protection Code: Add the following lines of code to your .htaccess file:
# Protect local.xml <FilesMatch "^local.xml$"> Order allow,deny Deny from all </FilesMatch>
This code will deny access to the local.xml file from all sources.
- Save and Upload the .htaccess File
- Flush Magento cache from Cache Management settings.
Advanced Practices to Prevent Brute Force Attacks on Magento 2
13. Leverage Your Hosting and Cloud Providers
Some hosting providers like Host Duplex have built-in defenses against denial of service (DoS) and brute force attacks. These hosting or cloud providers might allow you to simply configure throttling for specific routes. By identifying the routes that need protection and configuring your server accordingly, you can add an extra layer of security to your Magento store.

14. Adaptive Filtering or an Intrusion Prevention System (IPS)
Adaptive filtering is a technique used to identify and prevent brute force attacks. It works by monitoring login attempts and identifying patterns that are indicative of a brute force attack, such as rapid-fire login attempts or attempts from multiple IP addresses. Once such a pattern is detected, the system can take action to block the attack, such as locking the account or blocking the IP address.
An Intrusion Prevention System (IPS) works in a similar way. It monitors network traffic for suspicious activity and takes action to block potential attacks. This can be particularly effective against brute force attacks, as these often involve a high volume of network traffic.
To implement adaptive filtering or an IPS in Magento, you’ll need to work with your hosting provider or a cybersecurity professional. They can help you choose the right system for your needs and ensure it’s properly configured to protect your Magento store.
15. Implementing a Web Application Firewall (WAF)
A Web Application Firewall (WAF) is another powerful tool in the fight against brute force attacks. A WAF sits between your website and the internet, monitoring all incoming traffic for signs of malicious activity. If it detects a potential attack, it can take action to block it before it reaches your site.
There are many WAF solutions available, including cloud-based services and hardware appliances. Some popular options include Cloudflare, Sucuri, and Astra.
Bottom Line
Securing your Magento store against brute force attacks involves a combination of understanding the threat, implementing robust security measures, and maintaining vigilance through regular monitoring and auditing. It may seem like a daunting task, but the peace of mind that comes with knowing your store is secure is well worth the effort.
Now, it’s over to you. Take the knowledge you’ve gained from this article and put it into action. Review your current security measures, make any necessary improvements, and keep your Magento store safe from brute force attacks. Remember, the security of your store is not just about protecting your business—it’s also about protecting your customers and their trust in you.


15 Ways to Prevent Brute Force Attack in Magento 2