Have you ever wondered how to unlock the full potential of your eCommerce business? The answer lies in the powerful tool known as Magento 2 Rest API, a tool that’s more than just a buzzword—it’s a game-changer for online businesses, and it’s about time you discovered its potential.
In this article, we’ll provide a complete beginner’s guide to Magento 2 Rest API. Whether you’re new to the world of APIs or looking to enhance your knowledge, this guide has got you covered. From understanding the basics to diving into the nitty-gritty details, we’ll take you on a comprehensive journey.
What is an API?
An Application Programming Interface (API) is a software intermediary that enables data flow between two applications or systems through a standard protocol. It’s like a common language of communication between two entities from different locations. APIs allow applications to use functionalities and interact with other platforms.
What is Magento 2 Rest API?
The Magento 2 Rest API is a feature of Magento 2 (Adobe Commerce). It’s a software intermediary that allows two applications or systems to communicate with each other through a standard protocol. In simpler terms, it’s a common language that allows different systems to understand each other.
Magento 2 REST API allows developers to create an integration process easier with custom data and less complexity. The Magento 2 REST API is designed to provide web services that are easy to use, lightweight, and maintainable. It enables the integration of third-party services, mobile applications, and more with a Magento store.
How does it work?
The Magento 2 REST API operates over HTTP, using standard HTTP methods like GET, POST, PUT, and DELETE. It supports XML files and JSON format for input and output, making it a versatile choice for various applications.
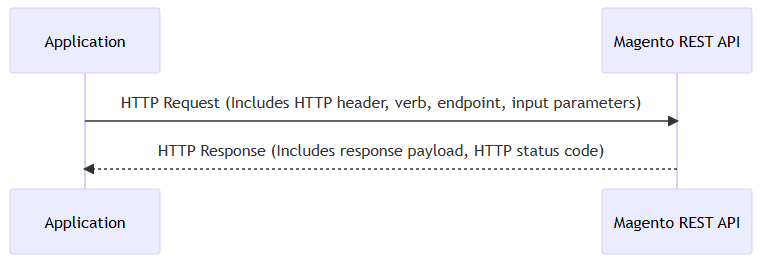
The Role of HTTP in APIs
The REST API in Adobe Commerce allows for interaction between the API and the application. This interaction is facilitated by HTTP. The process begins with an HTTP request that includes an HTTP header for authentication and other instructions. The request also includes a verb indicating the action against the endpoint (GET, POST, PUT, DELETE), and an endpoint, which is a Uniform Resource Indicator (URI) identifying the server, the web service, and the resource acted on. The call payload includes a set of input parameters and attributes supplied with the request. A response payload and an HTTP status code are then returned.
Why Choose Magento 2 REST API for Your eCommerce Store?
Choosing Magento 2 REST API for your eCommerce store opens up a world of possibilities. Here’s why:
- Integration: Magento 2 REST API allows seamless integration with various third-party services and applications. This means you can connect your Magento store with CRM systems, ERP software, payment gateways, shipping providers, and more.
- Mobile App Development: With Magento 2 REST API, you can develop mobile applications for your store. The API provides all the necessary endpoints for managing products, customers, orders, and more, making it easier to create feature-rich mobile apps.
- Customization: Magento 2 REST API is highly customizable. Developers can create custom API endpoints to meet specific business requirements, providing flexibility and control over your store’s functionalities.
- Expanded Functionality: You can use the API to create, read, update, and delete data in your Magento store. This includes data related to products, customers, orders, and more.
- Efficiency: REST APIs are stateless, meaning each request from the client to the server must contain all the information needed to understand and process the request. This leads to faster, more efficient data processing.
- Scalability: With Magento 2 REST API, your eCommerce store can easily scale as your business grows. The API can handle increasing loads, making it a future-proof choice for your business.

Understanding the Different Types of APIs in Magento 2
REST API
The REST (Representational State Transfer) API is a key feature of Magento 2, designed to provide a lightweight, easy-to-use interface for integrators and developers.
With the REST API, developers can perform requests and receive responses using HTTP protocol, making it a powerful tool for customizing and extending the capabilities of Magento stores. The REST API is based on the CRUD (create, read, update, delete) & search model, providing a comprehensive set of operations for managing your eCommerce store.
SOAP and GraphQL: Other APIs in Magento 2
In addition to the REST API, Magento 2 also supports SOAP (Simple Object Access Protocol) and GraphQL APIs.
The SOAP API is a standard protocol for exchanging structured information in web services using XML. It provides a way to communicate between applications running on different operating systems, with different technologies and programming languages.
On the other hand, GraphQL is a data query and manipulation language for APIs and a runtime for executing those queries with your existing data. It provides an efficient and powerful alternative to REST and offers significant advantages for some use cases.
Comparing REST, SOAP, and GraphQL in Magento 2
While all three APIs offer unique advantages, the choice between REST, SOAP, and GraphQL will depend on your specific needs and circumstances.
REST API is often favored for its simplicity and ease of use. It’s stateless and cacheable, making it highly scalable for large applications. However, it may not be the best choice for services requiring advanced features like transactions or coordinated updates to multiple resources.
SOAP API, while more complex, offers robust features like built-in error handling and ACID-compliant transactions. It’s a good choice for applications requiring a high level of security and reliability. However, its complexity can make it more difficult to use and slower in terms of performance.
GraphQL API offers a middle ground, providing the power and flexibility of SOAP with the simplicity of REST. It allows clients to specify exactly what data they need, reducing the amount of data that needs to be transferred over the network and improving performance. However, it’s a newer technology and may not be as widely supported or understood as REST and SOAP.
| Feature | REST | SOAP | GraphQL |
| Protocol | HTTP | HTTP, SMTP, TCP, UDP | HTTP |
| Data Format | JSON, XML | XML | JSON |
| Overhead | Low | High due to extensive XML usage | Low |
| Caching | Yes | No | Yes |
| Real-time Subscription | No | Yes | Yes |
| Flexibility | High | Low | Very High |
| Learning Curve | Low | High | Medium |
| Performance | Fast | Slow due to extensive XML usage | Fast |
| Security | OAuth, Basic Auth | WS-Security | OAuth, Basic Auth |
Please note that this is a general comparison and the actual performance and suitability of these APIs can depend on the specific use case and implementation.
In this guide, we’ll focus on RESTful API in Magento 2.
Setting Up Magento 2 REST API: A Step-by-Step Guide
Setting up APIs correctly is as crucial as setting up the store itself. In this section, we’ll walk you through the process of setting up Magento 2 REST API, ensuring your eCommerce store is ready for seamless integration and operation.
Preparing Your Magento 2 Store for REST API Integration
Before diving into the technicalities of setting up the REST API, it’s essential to prepare your Magento 2 store for integration. This preparation involves understanding the different types of access tokens that Magento issues. These tokens act like electronic keys, allowing you to access the API.
Magento issues three types of access tokens:
- Integration Tokens: These are indefinite and last until manually revoked. The merchant determines which resources the integration can access.
- Admin Tokens: These tokens have a default lifetime of 4 hours. The merchant determines which resources an admin user can access.
- Customer Tokens: These tokens have a default lifetime of 1 hour. Magento grants access to resources with anonymous or self-permission, and merchants cannot edit these settings.
Creating and Managing API Users in Magento 2
Creating and managing API users is a crucial part of setting up your Magento 2 REST API. When a merchant creates and activates an integration, Magento generates a consumer key, consumer secret, access token, and access token secret. All of these entities are used for OAuth-based authentication.
For example, to request a token for a customer account, you can use the following command:
curl -X POST "https://<host>/rest/default/V1/integration/customer/token" \
-H "Content-Type:application/json" \
-d '{"username":"customer@example.com", "password":"customer_password"}'
Configuring API Authentication in Magento 2
Once you’ve set up your API users, the next step is to configure API authentication. This process involves supplying an access token on the call, which acts as an electronic key to access the API.
For most web API calls, you supply this token in the Authorization request header with the Bearer HTTP authorization scheme to prove your identity. By default, an admin token is valid for 4 hours, while a customer token is valid for 1 hour. You can change these values from the Admin by selecting Stores > Settings > Configuration > Services > OAuth > Access Token Expiration.
For example, to make a web API call with an admin token, you can use the following command:
curl -X GET "http://<host>/rest/default/V1/customers/2" -H "Authorization: Bearer vbnf3hjklp5iuytre"
Diving Deep into Magento 2 REST Endpoints
Understanding the Structure of Magento 2 Rest API
The structure of Magento 2 REST API is made up of several components:
- HTTP Headers
- HTTP Verbs
- Endpoints
- Call Payload
HTTP Headers
Three key HTTP headers are used in your Magento 2 API calls:
- Authorization: This required header specifies the authentication token, which is returned by the Magento token service.
- Accept: This optional header specifies the format of the response body. JSON is the default.
- Content-Type: This required header for operations with a request body specifies the format of the request body.
HTTP Verbs
HTTP verbs represent the action against the endpoint. They can be GET (requests a current representation transfer of the target resource), PUT (requests the target resource’s state be created or replaced), POST (requests the representation enclosed in the request to be processed by the target resource), and DELETE (requests the target resource to be deleted by the origin server).
Endpoints
Endpoints are a combination of the server, web service, store code, resource against, and template parameters. For example, in the endpoint http://magento.ll/index.php/rest/default/V1/customerGroups/:id, magento.ll/index.php/ is the server, rest is the web service, /V1/customerGroups is the resource, and id is the template parameter.
Different Types of API Endpoints in Magento 2
The Magento 2 REST API endpoints can be categorized based on the type of user:
- Guest User: These are public API endpoints that require no authentication. For example, getting product information.
- Admin User: These are private API endpoints that require admin-level access. For example, changing product information.
- Customer: These are private API endpoints that require customer-level access. For example, viewing previous orders.
How to Use Public, Admin, and Customer API Endpoints?
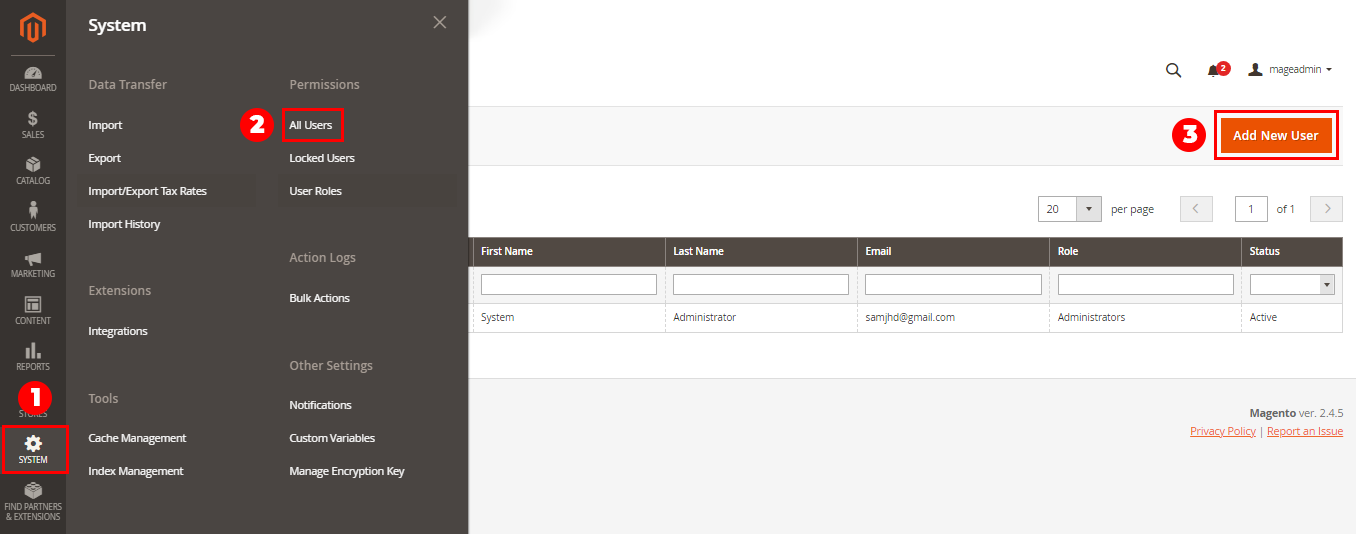
To use the Magento 2 REST API, you need to register a new web service, create a new integration, and configure the authentication. Here are the steps to do that:
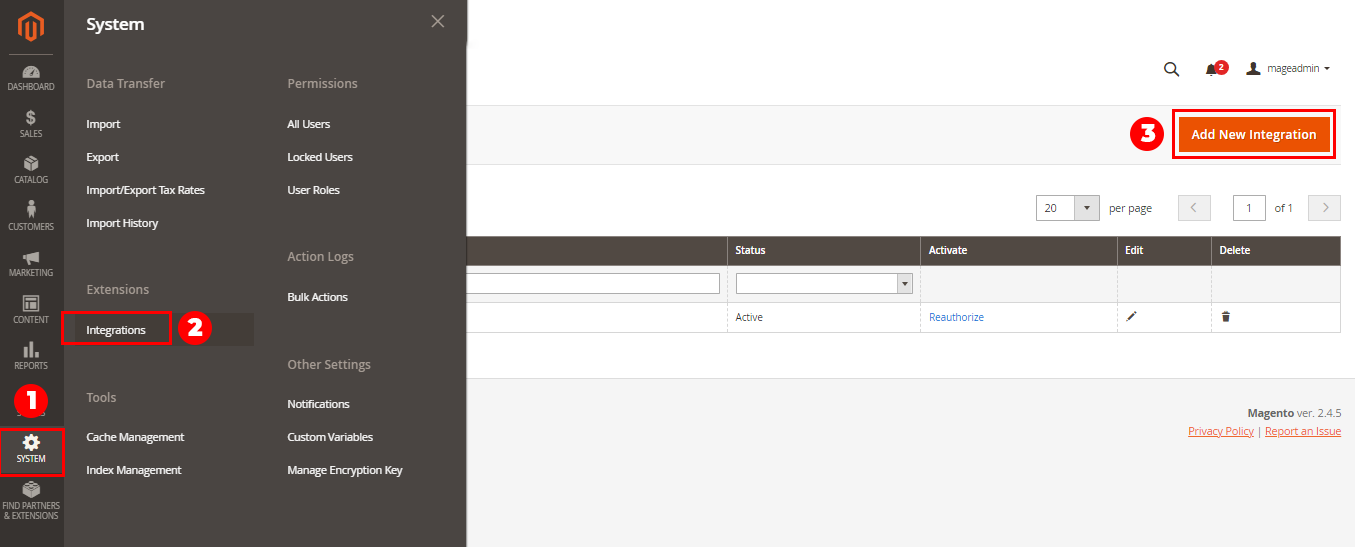
- Create a New Web Service: Go to System > Permission > All Users > Add New User and create a new token-based authentication in Magento 2.

- Create a New Integration: Go to Systems > Extensions > Integration > Add New Integration.

- Configure Authentication: Set up the authentication via REST or SOAP as per your needs.
These requests use three types of authentication: Token-Based Authentication, Session-Based Authentication, and OAuth-Based Authentication.
- Token-Based Authentication: This method requires an authorization token, which is specified in the Authorization request header with the HTTP authorization scheme Bearer. The token is returned by the Magento token service.
- Session-Based Authentication: This method uses the user’s session to authenticate requests. It’s typically used for frontend operations where the user is interacting with the Magento storefront.
- OAuth-Based Authentication: This method is used for third-party integrations. It involves a more complex flow where the third-party application requests access, the user grants permission, and the application receives an access token.
Creating Custom REST API Endpoints in Magento 2
Magento 2 allows you to develop your own custom API and use it. You can create custom API endpoints based on your specific needs and requirements. This feature is particularly useful when you want to integrate third-party apps with your Magento 2 platform.
Remember, the Magento 2 API is a powerful tool that can help you extend the functionality of your e-commerce store. By understanding the different types of API endpoints and how to use them, you can leverage the full potential of Magento 2 and create a more seamless and efficient online shopping experience for your customers.
Call Payload
The call payload is a set of input parameters and attributes supplied with the request. Input parameters are specified in the URI, while input attributes are specified in a JSON- or XML-formatted request body.
Refer to the official Magento 2 documentation or consult with Magento 2 experts for the most accurate and up-to-date information.
Practical Tutorials on Using Magento 2 REST API
In this section, we’ll delve into the practical aspects of using the Magento 2 REST API. We’ll guide you through making your first API call, managing products, categories, and customers, and even advanced operations like managing orders, invoices, and cart management.
Making Your First API Call in Magento 2
Are you ready to make your first API call in Magento 2? It’s a thrilling experience that opens the door to a world of possibilities. But first, you need to understand the structure of a REST call in Magento. It follows this format: <HTTP verb> http://<host>/rest/<scope>/<endpoint>.
Before you make your first call, ensure you have installed a REST client (Postman is recommended), know how to construct a REST call in Magento, and have access to the Magento REST API documentation.
Using Magento 2 REST API to Manage Products, Categories, and Customers
Managing products, categories, and customers is a common task in eCommerce, and Magento 2 REST API makes it easier. With the API, you can create, read, update, and delete products, categories, and customers.
For instance, to create a new product, you would use the POST HTTP verb and the /V1/products endpoint. The payload would contain the details of the product, such as the SKU, name, price, and attribute set ID.
Similarly, you can manage categories using the /V1/categories endpoint and customers using the /V1/customers endpoint. Remember to use the appropriate HTTP verb for the operation you want to perform.
Advanced Magento 2 REST API Operations: Orders, Invoices, and Cart Management
Once you’re comfortable with the basics, you can move on to more advanced operations like managing orders, invoices, and carts. These operations follow the same principles as managing products, categories, and customers, but they involve more complex endpoints and payloads.
For example, to create an order, you would first create a quote, convert it to an order, issue an invoice, and then ship the order. Each of these steps involves multiple API calls to different endpoints.
Remember, practice makes perfect. So, don’t be afraid to experiment with different API calls and see what they do. Just make sure you’re working in a test environment to avoid affecting your live store.
Ensuring Security and Efficiency with Magento 2 REST API
In Magento 2 REST API, it’s crucial to understand the importance of security and efficiency. The right practices can ensure your API usage is not only secure but also optimized for better performance.
This section will guide you through the best practices for secure API usage, optimizing your API calls, and troubleshooting common issues with Magento 2 REST API.
Best Practices for Secure API Usage in Magento 2
Security is paramount when dealing with APIs. Magento 2 REST API is no exception. Here are some best practices to ensure secure API usage:
Use HTTPS: Always use HTTPS for API communication to ensure the data exchanged between your Magento store and the client is encrypted and secure.
Token-based Authentication: Magento 2 REST API supports token-based authentication. This method is more secure as it doesn’t require the user to provide their username and password with each API call.
Limited Access: Limit the access of your API users. Not every user needs access to all resources. By limiting access, you can reduce the risk of unauthorized data manipulation.
Regular Updates: Keep your Magento 2 platform updated. Each update not only brings new features but also includes security patches that can protect your store from known vulnerabilities.
Optimizing Your API Calls for Better Performance
Efficiency is another crucial aspect of API usage. Here are some tips to optimize your Magento 2 REST API calls:
Use Filters: Instead of fetching all data and filtering it on the client side, use filters in your API calls to get only the data you need.
Limit Data: Use the ‘fields’ parameter to limit the data returned by your API calls. This can significantly reduce the size of the API response and improve performance.
Pagination: If you’re dealing with large data sets, use pagination to break the data into manageable chunks. This can prevent your API from timing out and improve response times.
Troubleshooting Common Issues with Magento 2 REST API
Despite your best efforts, you may encounter issues while using the Magento 2 REST API. Here are some common problems and their solutions:
Authentication Errors: If you’re getting errors like “The consumer isn’t authorized to access %resources”, check your authentication credentials and ensure you’re using the correct authentication method.
404 Not Found Errors: If you’re getting a 404 error, check your API endpoint. Make sure the resource you’re trying to access exists and you’re using the correct HTTP method (GET, POST, PUT, DELETE).
Data Errors: If you’re getting errors like “Invalid data”, check the data you’re sending in your API request. Make sure it’s in the correct format and includes all required fields.
Remember, the Magento community is a great resource for troubleshooting. Platforms like Magento Stack Exchange have a wealth of information and helpful community members who can assist with more complex issues.
Further Reading and Resources
Where to Learn More About Magento 2 REST API?
The Magento 2 REST API is a powerful tool that can greatly enhance the functionality of your eCommerce store. To fully leverage its capabilities, it’s crucial to educate yourself and stay updated with the latest developments continually. Here are some resources that can help you deepen your understanding:
Magento 2 Developer Documentation
This is the official documentation provided by Magento. It provides comprehensive information about the Magento 2 REST API, including its architecture, how to use it, and examples of API calls. You can find it here.
Magento 2 REST API Tutorials
There are numerous tutorials available online that can guide you through the process of using the Magento 2 REST API. Websites like Stack Overflow and Magento’s own community forums are great places to find these tutorials.
We’ve compiled a list of tutorial topics that can guide you in your journey of mastering the Magento 2 Rest API. These tutorials are designed to provide you with practical knowledge and hands-on experience in using various aspects of the API.
Here are some of the tutorial topics that you can look forward to:
- How to Get the Admin Token in Magento 2 API
- How to Retrieve Store IDs, Names, and Codes with Magento 2 API
- How to Access CMS Page Content Using Magento 2 API
- How to Fetch All Categories with Magento 2 API
- How to Retrieve All Products: A Magento 2 API Tutorial
- How to Get a Product by SKU with Magento 2 API
- How to Understand SearchCriteria in Magento 2 API
- How to Get All Available Currencies with Magento 2 API
- How to Create a New Customer in Magento 2 API
- How to Obtain the Customer Token: A Magento 2 API Guide
- How to Generate a Customer Token Using Customer ID (Custom API)
- How to Reset a Customer Password with Magento 2 API
- How to Create a Cart and Add Products: A Magento 2 API Tutorial
- How to Implement Wishlist Functionality with Magento 2 API (Custom REST API)
- How to Set Shipping and Billing Information in Magento 2 API
- How to Create an Order: A Step-by-Step Magento 2 API Tutorial
Useful Tools and Extensions for Magento 2 REST API
To maximize the potential of the Magento 2 REST API, there are several tools and extensions that you can use. Here are some of the best ones:
- Magento 2 Multi-vendor Marketplace Extension: This extension allows you to transform your Magento 2 store into a multi-vendor marketplace, similar to Amazon or eBay. It supports REST API, allowing third-party applications to connect with your store’s data smoothly. You can find more about it here.
- Magento 2 Mega Menu Pro: This tool helps you organize your store’s products into specific categories for easier navigation. It uses REST API to allow third-party software to access the menus you’ve created.
- Magento 2 Out Of Stock Notification: This extension sends notifications to your customers when a product is back in stock or when its price changes. It uses REST API to allow third-party software to access your stock status.
- Magento 2 Coupon Extension: This tool helps you generate coupon codes and keep track of your sales campaigns. It uses REST API to allow third-party software to generate coupon codes.
- Magento 2 Customer Approval Extension: This extension helps you manage customer registrations and logins. It uses REST API to allow you to approve or disapprove customer accounts quickly.
Wrapping Up
To recap, Magento 2 REST API is a powerful tool that can greatly enhance your eCommerce experience. From its role in eCommerce to its different types and how to set it up, we’ve covered a lot of ground. We’ve also explored the practical tutorials on using Magento 2 REST API, ensuring security and efficiency.
Leveraging Magento 2 REST API for business success involves staying updated with the latest developments and enhancements. With the advent of PWAs and the continuous improvements in Magento 2 REST API, businesses have a lot to look forward to. By choosing the right Magento hosting services like Host Duplex and making the most of the features offered by Magento 2 REST API, businesses can ensure a smooth, efficient, and profitable eCommerce experience.


Mastering Magento 2 REST API: The Best Guide for Beginners