The global beverage market is booming, and with its projection to soar to a staggering $4.39 trillion by 2028, it presents a golden opportunity for entrepreneurs. Gone are the days when beverages were confined to the shelves of physical stores. If you’re thinking of entering this market, you’ll need more than just a great product—you’ll need the right platform, and not just any platform will do. You need something robust, scalable, and tailored to your specific needs.
Magento 2 stands out as a premier e-commerce choice, offering unparalleled control over your online store. Its open-source flexibility, combined with an SEO-optimized framework, ensures your beverage store has the tools to excel in a competitive environment.
So, are you ready to take the plunge and start your online beverage store with Magento 2? Keep reading as we guide you through every step of the process, from How to launch your beverage store on Magento to how to market your store effectively.
Why Magento 2 is the Right Choice for Your Beverage Store
Open-Source and Customizable
With Magento 2, you have the freedom to build your online store just the way you want it. Being an open-source platform, it allows you to modify the source code to suit your specific business needs. You can add custom features, integrate third-party tools, and even change the entire look and feel of your store. This level of customization is particularly beneficial for a niche market like beverages, where customer preferences can vary widely.
Scalable for All Business Sizes
Starting small? No problem. Planning to expand globally? Magento 2 has got you covered. The platform is designed to scale with your business. You can start with a basic setup, and as your customer base grows, you can add more features or even switch to a more advanced version of Magento. This scalability ensures that you don’t have to switch platforms or make significant changes as your business grows, saving you both time and money.
Robust Security Features
In this digital age, security is not something to be taken lightly. Magento 2 offers robust security features to protect both you and your customers. From strong data encryption to secure online payments, Magento 2 ensures that all transactions are carried out in a secure environment. This is crucial, especially for the stores selling wine where age verification and secure payment options are a must.
Extensive Range of Extensions and Plugins
The Magento marketplace is like a treasure trove of extensions and plugins. Whether you need to add a new payment method, integrate your ERP system, or even add a chatbot for customer service, there’s an extension for that. The best part? Most of these extensions are developed by the Magento community, ensuring they meet the highest quality standards.
Strong Community Support
Last but not least, let’s talk about the people behind Magento 2. The platform has a vibrant community of skilled Magento developers, designers, and e-commerce experts who are always ready to help. Whether you’re stuck on a technical issue or need advice on best practices, you can always turn to the community for support. This is an invaluable resource, especially if you’re new to e-commerce.
If you’re considering different platforms, take a look at our in-depth comparisons:
These articles will provide you with valuable insights into the features, pricing, and scalability of these platforms, helping you choose the one that aligns best with your business goals.
Choosing Magento for launching your beverage store online comes with its set of advantages, showcased by numerous reputable brands already utilizing this platform. For a closer look at these brands, feel free to explore our article Top 75+ Brands Using Magento.
What are the Legal Requirements and Compliance to Start a Beverage Store?
One can’t simply jump into online beverage sales without understanding the legal landscape. This section aims to guide you through the essential legal requirements and compliance measures you’ll need to consider before starting an e-commerce store.
Necessary Licenses for Selling Beverages Online
In the United States, there are several licenses and registrations you need to obtain before you can start selling beverages online, especially if those beverages contain alcohol. Here are the most common forms of licensing your eCommerce alcohol business needs:
- Manufacturer’s License: This license means you’re legally permitted to produce your own alcoholic beverages.
- Employer Identification Number (EIN) or Federal Tax ID (FTID): EINs are required to open business bank accounts, hire employees, track taxes, and complete business paperwork.
- eCommerce Business License: This is needed for conducting business online.
- Shipping License: This is required for shipping your products.
- Retail License: This allows you to sell your products to consumers.
In addition to these, you also need to:
- Obtain a Federal License: Your first stop will be the Alcohol and Tobacco Tax and Trade Bureau (TTB), which operates under the Department of the Treasury. TTB ensures that only qualified businesses enter the alcohol and tobacco industries and that those businesses collect and remit all applicable federal taxes on the products they sell.
- Obtain an Operating State License: Next, you have to obtain a license to operate in your home state; this allows you to operate and produce alcoholic beverages in that state.
- Register with States Where You Have Customers: You need to register your business in each state where you have customers.
- Register Your Beverage Alcohol Products: You need to register your beverage alcohol products federally and in applicable states.
- Register to Collect and Remit Applicable Federal, State, and Local Taxes: You need to register to collect and remit applicable federal, state, and local taxes.
Please note that these are general guidelines, and the specific requirements may vary based on the location of your business and your customers. It’s always a good idea to consult with a legal expert to ensure full compliance.
Other Compliance Measures
Selling beverages online comes with its own set of challenges, especially when it comes to legal compliance. Here are some specific legal requirements and compliance considerations for online beverage stores in the U.S., particularly those selling alcohol:
- Age Verification: Online alcohol retailers must have robust systems in place to verify the age of customers. This is to ensure that alcohol is not sold to minors.
- Shipping Regulations: The shipping of alcohol has specific legal restrictions, both domestically and internationally. These regulations can vary widely by state.
- Tax Compliance: Beverage alcohol businesses must manage a variety of tax obligations, including sales tax, excise tax, and others. These can vary significantly based on the location of the business and the customer.
- Advertising Regulations: There may be specific regulations governing how alcohol can be advertised and promoted online.
- Data Protection: Like all online retailers, online alcohol stores must comply with data protection regulations.
- Global Standards: In response to the growth of online alcohol sales, global standards have been launched for the online sale and delivery of alcoholic beverages. These standards aim to prevent sales to those underage or intoxicated and where prohibited by law.
Magento Open Source vs. Magento Commerce: Which One is for You?
If you decide to go with Magento, you have two primary options: Magento Open Source and Magento Commerce (Adobe Commerce).
Magento Open Source: This is a free version suitable for small to medium-sized businesses. It offers essential features like catalog management, SEO settings, and basic analytics. If you’re a startup or a small business, start with Magento Open Source. You can always upgrade later.
Adobe Commerce: This is a paid version that comes with premium features like customer segmentation, targeted promotions, and 24/7 support. If you’re an established business looking for advanced features, opt for Magento Commerce.
To decide, list down your business needs, budget, and long-term goals. Compare these with the features offered by both versions.
| Feature | Magento Open Source | Adobe Commerce |
| Pricing | Free | Subscription-based pricing |
| B2B Functionality | Limited | Comprehensive B2B features |
| Advanced Marketing Tools | Basic | Advanced marketing and personalization |
| Customer Segmentation | Limited | Robust customer segmentation |
| Content Staging | Not available | Content staging for controlled releases |
| Technical Support | Community support | Dedicated expert technical support |
| Security Updates | Community-driven | Regular security updates and patches |
| Extensions and Marketplace | Access to extension marketplace | Same as Magento Open Source |
| Scalability | Suitable for SMBs | Scalable for medium to large businesses. |
How to Launch Your Beverage Store on Magento: Step-by-Step Guide
Select a Web Host and Domain Name
Choosing the right web host is crucial for your Magento 2 store’s performance. Here’s what to consider:
Hosting: Opt for a Magento-specific hosting provider like Host Duplex that offers high performance, security features like SSL certificates, and 24/7 technical support. Research and compare different Magento-specific hosting plans. Look for customer reviews and performance metrics.
Domain Name: Your domain name should be short, catchy, and relevant to your brand for better SEO rankings. Use domain name generators to come up with a list of available names that fit your brand. Register your chosen domain name as soon as possible.
To decide, compare different hosting providers and domain registrars. Look for reliability, customer service, and additional features like backup and security.
Review Magento Stack & Hosting Requirements
Before installation, make sure your server meets Magento’s system requirements. This includes:
- Operating System: Linux x86-64
- Web Server: Apache 2.43 or Nginx
- Database: MariaDB 10.4 or MySQL 8.0
- PHP: 8.1 or 8.2
- Composer: 2.2
- Elasticsearch: 7.17 or OpenSearch 1.2
- RabbitMQ: 3.9 or 3.11
- Redis: 6.2 or 7.0
Please note that the specific versions may vary depending on the Magento version you are using. You can check the official Magento documentation for more information.
Check your current system specifications. If they don’t meet the requirements, you’ll need to upgrade your system.
Download and Install Magento
Using Composer:
- Access your server: Use SSH to log into your server.
- Navigate to the webroot directory: Change your directory to the webroot.
- Run the Composer command: Execute
composer create-project --repository-url=https://repo.magento.com/ magento/project-community-edition.
Without Composer:
- Visit the Magento website: Open your web browser and go to the official Magento website.
- Navigate to the Tech Resources page: Look for the Tech Resources page on the website.
- Download Magento 2 Community Edition: Find and download the Magento 2 Community Edition.
Create a Database
- Log in to your hosting control panel: Access your hosting provider’s control panel.
- Navigate to the database section: Look for the database section in the control panel.
- Create a new database: Set up a new database for your Magento 2 installation.
Web Setup Wizard
- Open a web browser: Launch your preferred web browser.
- Go to your Magento 2 installation URL: Enter the URL where you installed Magento 2.
- Follow the on-screen instructions to set up Magento, which includes:
- Localization: Choose your time zone, default currency, and language.
- Configuration: Set up the database, web access options, and more.
- Create Admin Account: Set the username, email, and password for the Magento admin account.
Command Line Installation
If you prefer using the command line, you can install Magento 2 using this command:
bin/magento setup:install --base-url=http://yourdomain.com/ --db-host=localhost --db-name=db_name --db-user=db_user --db-password=db_pass --admin-firstname=YourName --admin-lastname=YourLastName --admin-email=user@example.com --admin-user=admin --admin-password=admin123 --language=en_US --currency=USD --timezone=America/Chicago --use-rewrites=1
Post-Installation
- File Permissions: Ensure that the correct file permissions are set for the Magento 2 installation.
- Cron Jobs: Set up cron jobs to automate tasks like reindexing, newsletters, updates, and more.
- Full Page Cache: Enable this to improve your store’s performance.
Configure Basic Settings in Magento 2 for Your Beverage Store
Configuring the basic settings of your Magento 2 store is a pivotal step in ensuring that your beverage store operates smoothly. These settings encompass the foundational aspects of your store, such as locale, currency, and store information. Following are the steps to configure these settings:
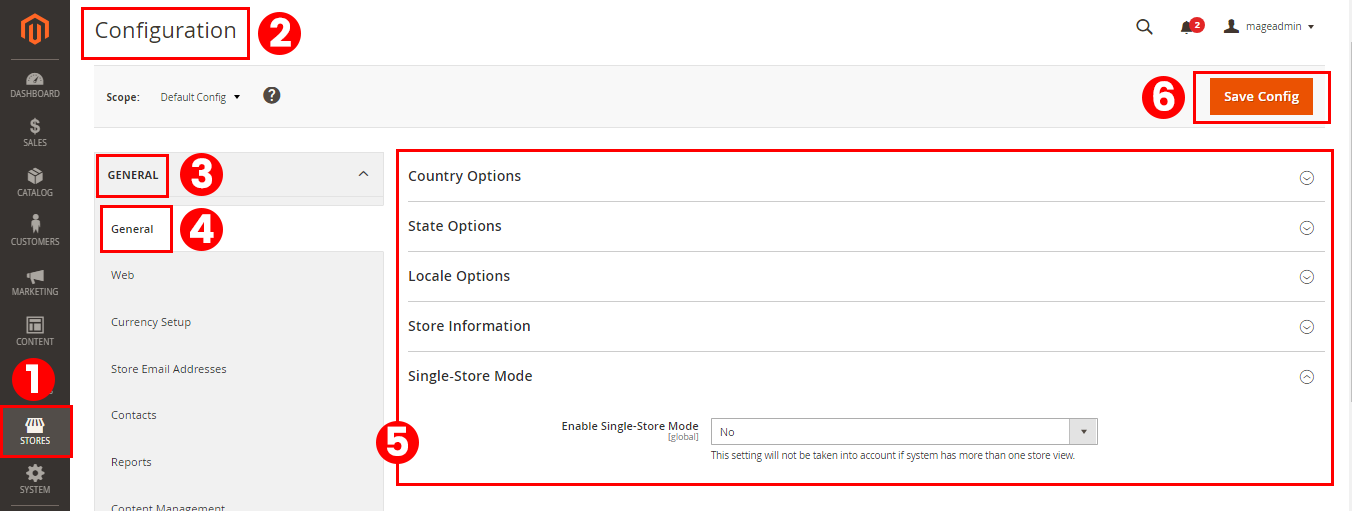
1. Setting Your Store’s Locale, Language, and Currency
Magento 2 offers a plethora of options when it comes to setting the language, locale, and currency for your store. This ensures that your beverage store caters to a global audience, offering them a personalized shopping experience.
- Locale Options: Navigate to Stores > Configuration > General > General. Here, you can set the country, time zone, and locale for your store. For a beverage store, it’s crucial to select the locale that aligns with your primary customer base.

- Currency Setup: Under the same General tab, you’ll find the Currency Setup option. Magento 2 supports multiple currencies, allowing you to price your beverages in various currencies if you’re catering to an international audience.
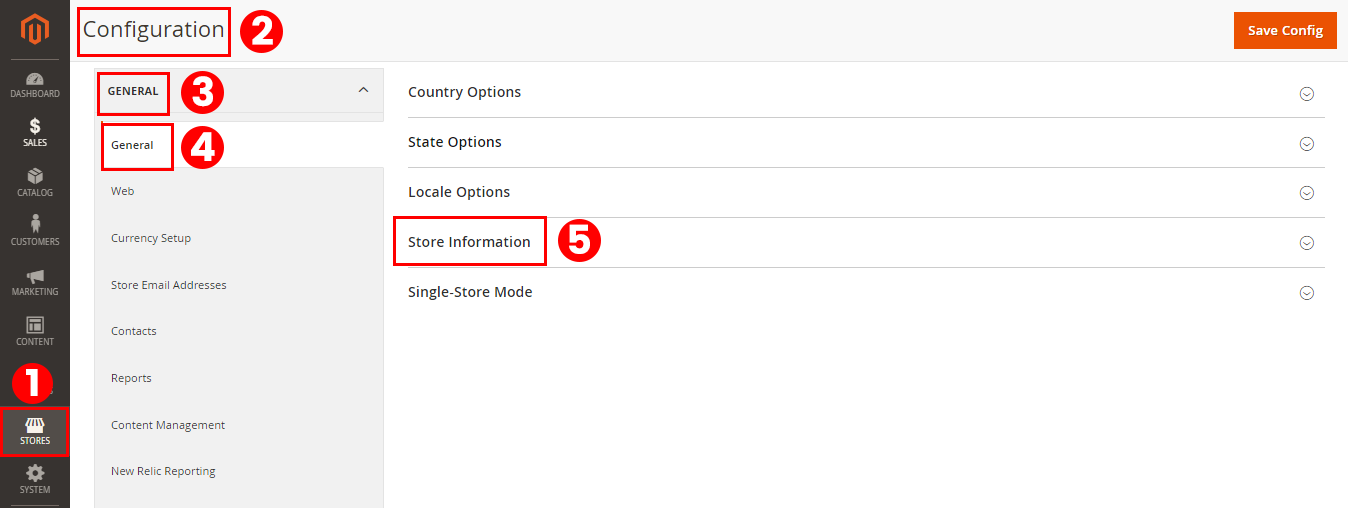
2. Configuring Store Information
Your store’s information, including its name, address, and contact details, is vital for building trust with your customers. To set this up:
- Navigate to Stores > Configuration > General > Store Information.

- Fill in the necessary details, such as store name, address, and phone number. For a beverage store, ensure that the name is catchy and resonates with the products you’re selling.
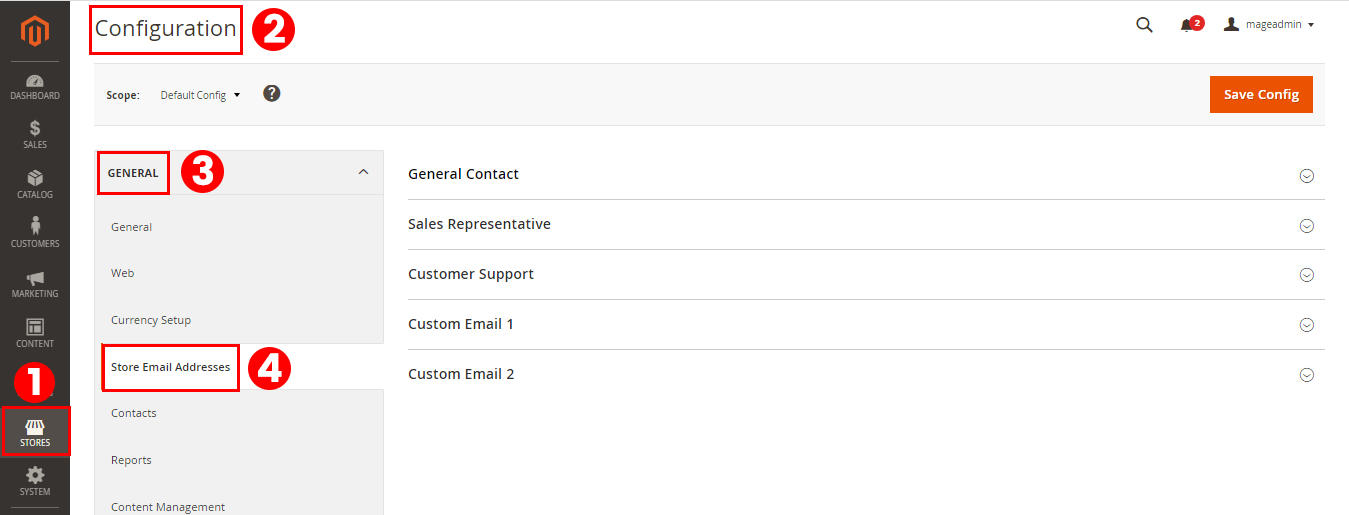
3. Setting Up Store Emails
Communication is key in e-commerce. Magento 2 allows you to configure various email templates for order confirmations, newsletters, and more.
- Go to Stores > Configuration > General > Store Email Addresses. Here, you can set up different email addresses for sales, support, and general queries.

- Under the Sales tab, you can configure order and shipment emails. Ensure that these emails are clear and provide all necessary information about the purchased beverages.
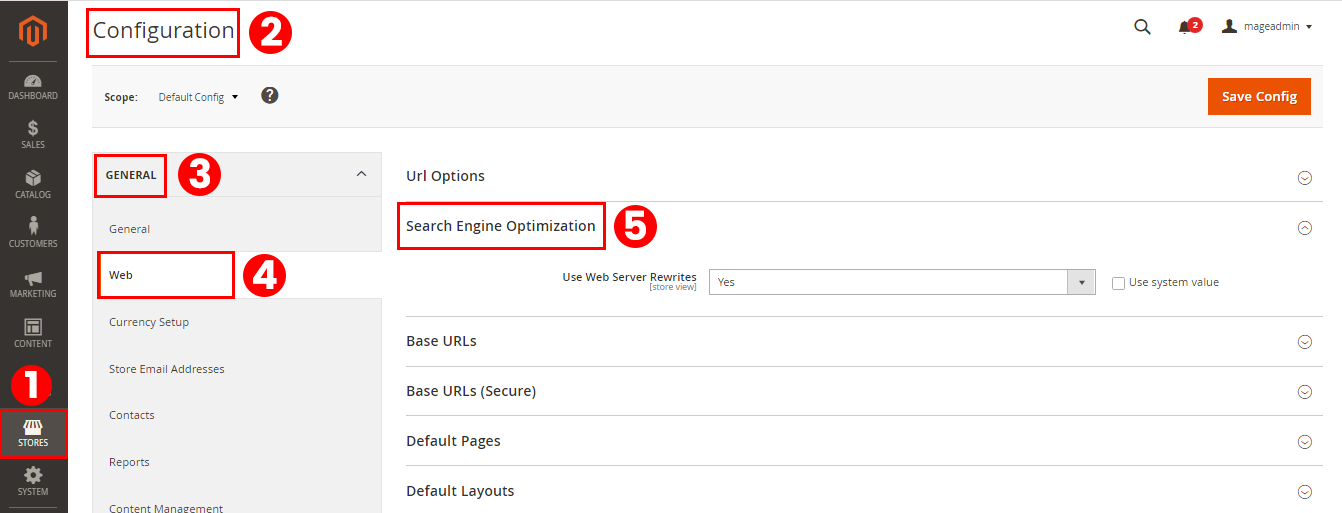
4. SEO Optimization
For your beverage store to thrive, it needs to be visible on search engines. Magento 2 offers robust SEO settings to help with this.
- Navigate to Stores > Configuration > General > Web. Here, you can set up URL rewrites, optimize meta-data, and more. Ensure that your product pages, especially for best-selling beverages, are optimized with relevant keywords.

5. Creating a Staging Environment
Before making any significant changes to your store, it’s wise to test them in a staging environment. This ensures that any modifications don’t adversely affect your live store. The process for setting up a staging environment varies depending on your hosting provider.
Choose and Install a Magento Theme
Installing and configuring a theme in Magento 2 can be a bit technical, but with the right steps, it’s manageable. Here’s a general overview of the process:
- Backup Your Store: Before making any changes, always back up your Magento store. This ensures that you can restore your site to its previous state in case anything goes wrong.
- Purchase and Download the Theme: Once you’ve decided on a theme, purchase and download it. In this case, you would purchase the MageBees Wine/Beer Shop Theme.
- Upload the Theme:
- Extract the theme package you’ve downloaded.
- Using an FTP client or through your hosting cPanel, upload the theme files to the app/design/frontend/ directory of your Magento 2 store.
- Activate the Theme:
- Log in to your Magento Admin Panel.
- Navigate to Content > Design > Configuration.
- Click on the edit link for your store view.
- In the Applied Theme dropdown, select the theme you’ve uploaded, in this case, the MageBees Wine/Beer Shop Theme.
- Save the configuration.
- Configure the Theme:
- Each theme may come with its own set of configurations. Refer to the theme’s documentation for specific settings and configurations.
- For the MageBees Wine/Beer Shop Theme, you might need to configure the included extensions, set up the homepage layout, customize the header and footer, etc.
- Clear Cache:
- After making changes, always clear the Magento cache to see the updates.
- Navigate to System > Cache Management and flush the Magento cache.
- Test Your Site:
- Once the theme is installed and configured, thoroughly test your site to ensure everything is working as expected.
- Check the responsiveness on different devices, test the checkout process, and ensure all pages are loading correctly.
- Seek Support if Needed:
- If you encounter any issues or need assistance with the theme, reach out to the theme developer for support.
Extend Store Functionality
The beauty of Magento 2 lies in its extensibility. With a plethora of extensions and plugins available, you can tailor your beverage store to offer unique features that cater to your customers’ needs. Here’s how you can enhance your store’s functionality:
Install Necessary Extensions and Plugins
Extensions can provide that edge, offering features that can turn casual browsers into loyal customers. For a beverage store, this could mean anything from specialized search filters for different types of beverages to loyalty programs for frequent buyers.
Steps to Install Extensions:
Research & Choose: Before diving in, research and identify extensions that align with your store’s goals. For instance, if you’re keen on offering a store pickup option, the Store Pickup by Mageplaza extension might be ideal.
1. Magento Marketplace: This is the official platform for Magento extensions. Simply navigate to the Magento Marketplace, search for the desired extension, and purchase or download it.
2. Extension Installation:
- Using Composer:
Step 1. Access your server via SSH.
Step 2. Navigate to the webroot directory.
Step 3. Run the command:composer require <component-name>:<version>. You can find the component name and version in the extension’s composer.json file or on the extension’s page in the Magento Marketplace.
Step 4. Enter your authentication keys when prompted. Your public key is your username; your private key is your password.
Step 5. Wait for Composer to finish updating your project dependencies and make sure that there aren’t any errors.
Step 6. To verify that the extension is installed properly, run the following command:bin/magento module:status <Module_Name> - Using Web Setup Wizard: The Web Setup Wizard was removed from Magento 2.4.0 and higher versions. Therefore, if you’re using Magento 2.4.0 or later, you should use Composer to install extensions.
3. Configuration: After installation, most extensions will have their own settings that you’ll need to configure. This is usually found under the Stores > Configuration section.
Recommendations for a Beverage Store:
- Advanced Search: Given the variety of beverages – from types to regions to brands – an advanced search extension can enhance user experience significantly.
- Loyalty Programs: Reward your frequent buyers with points or discounts. This not only encourages repeat purchases but also fosters brand loyalty.
Add and Manage Products
Managing your products effectively is the backbone of any eCommerce store, especially in the beverage industry, where trends can change rapidly and seasonal products are common. Magento 2 offers a robust system for product management, ensuring that your beverage store is always stocked and ready to serve your customers. Let’s explore how you can maximize Magento 2’s product management features for your beverage store.
Add Your Beverage Products
- Log into your Magento 2 Admin Panel. Navigate to the dashboard, which is the central hub for all your store’s operations.
- Navigate to the Products Section. On the left sidebar, click on ‘Catalog’ and then ‘Products’.
- Add a New Product. Click on the ‘Add Product’ button. Here, you’ll be presented with various product types like Simple, Configurable, Grouped, etc. For most beverages, a ‘Simple Product’ type will suffice.
- Fill in Product Details.
- Name: Enter the name of the beverage.
- SKU: This is a unique identifier for each product. It can be the barcode or any unique code you use.
- Price: Set the price for the beverage.
- Images: Upload high-quality images of the beverage. This is crucial as customers rely heavily on images when shopping online.
- Description: Provide a detailed description of the beverage. Mention its ingredients, taste profile, and any other relevant information.
- Set Inventory. Under the ‘Quantity’ section, input how many units of the beverage you have in stock. Magento 2 will automatically update this as products are sold.
- Categorize Your Product. For ease of navigation for your customers, categorize your beverages. For instance, you can have categories like ‘Sodas’, ‘Juices’, ‘Alcoholic Beverages’, etc.
- SEO Optimization. Under the ‘Search Engine Optimization’ tab, fill in the ‘URL Key’, ‘Meta Title’, and ‘Meta Description’. This will help your products rank better on search engines.
- Save Your Product. Once all details are filled in, click on the ‘Save’ button.
- Repeat for All Beverages. Follow the above steps for each beverage you want to add to your store.
Tip: For beverages that come in different flavors or sizes, consider using the ‘Configurable Product’ type. This allows customers to choose a variant of the product (e.g., a particular flavor or size) from a dropdown menu on the product page.
Inventory Management
Magento 2 offers various extensions that can enhance your inventory management capabilities. These tools can help with exact order fulfillment, better inventory planning, and increased customer satisfaction. Some top inventory management extensions for 2023 include Magento 2 Inventory Report, Multi Warehouse Inventory, and Inventory Management by Magestore.
Set Up Payment and Shipping Methods
A seamless checkout experience is vital for eCommerce stores, especially for beverage stores with frequent or bulk purchases. Magento 2 ensures this by offering multiple payment methods and efficient shipping options, catering to all customers, whether they’re buying a single bottle of wine or a crate of sodas.
Set Up Payment Methods
- Understand Your Audience: Before diving into the technicalities, understand your target audience. Are they more likely to pay via credit cards, digital wallets, or bank transfers? Knowing this can help you prioritize which payment methods to set up first.
- Navigate to Payment Options: Log into your Magento Admin Panel. Go to Stores > Configuration > Sales > Payment Methods.
- Choose a Payment Method: Magento 2 offers a variety of built-in payment methods like Direct Bank Transfer, Cash on Delivery, and more. Additionally, you can integrate with popular payment gateways like PayPal, Stripe, and Braintree.
- Configure the Payment Method: Click on your chosen payment method. Fill in the required details. For instance, if you’re setting up PayPal, you’d need to enter your PayPal email and API credentials and set the payment action (e.g., authorize or capture).
- Save Configuration: Once you’ve filled in all the details, click on ‘Save Config’.
Set Up Shipping Methods
- Determine Your Shipping Strategy: Will you offer free shipping, flat-rate shipping, or table rates based on weight, price, or destination? Decide this based on your business model and what your competitors are offering.
- Navigate to Shipping Methods: In your Magento Admin Panel, go to Stores > Configuration > Sales > Shipping Methods.
- Choose and Configure a Shipping Method: Magento 2 provides several built-in shipping methods like Flat Rate, Free Shipping, and Table Rates. Choose one based on your strategy and configure it. For instance, for a Flat Rate, you’d set a specific price, handling fee, and possibly a type (per item or per order).
- Integrate with Carriers: If you’re planning to use carriers like UPS, FedEx, or DHL, Magento 2 allows integrations with these services. You’d need to set up an account with the carrier, get the API credentials, and then configure the integration in Magento.
- Save Configuration: After setting up, remember to save your configuration.
Pro Tip for Beverage Stores: Given the fragile nature of many beverages, especially glass-bottled ones, consider offering insurance or special packaging as part of your shipping options. This can be a value-added service that many customers might appreciate.
Test Your Store Before Going Live
Before launching your beverage store on Magento 2, ensuring that everything works seamlessly is crucial. Testing is not just about finding bugs; it’s about ensuring a smooth user experience, security, and optimal performance. Here’s a step-by-step guide to testing your Magento 2 beverage store:
Functional Testing
- Purpose: To simulate customer behavior on your e-commerce website and ensure that everything works flawlessly on the front end.
- How It’s Done: Test steps interact directly with page objects, triggering possible actions such as clicking on product categories or checking out. For instance, you can imitate a customer placing an order on the website and observe how successful and unsuccessful payments unfold.
Integration Testing
- Purpose: To ensure seamless interaction between Magento and supporting technologies, such as CRM, ERP, or PIM.
- How It’s Done: Check if data flows correctly between different parts of the store and if updates get reflected in all the systems involved. For example, when a customer places an order, ensure that the order details are correctly added to the CRM system.
Web API Functional Testing
- Purpose: To verify the operation of Magento Web APIs and identify any deviations from the expected performance.
- How It’s Done: Test both REST and SOAP communication protocols. For instance, ensure that the Magento REST API integration, which connects the e-commerce part to back-office systems, functions correctly.
Performance Testing
Your website’s speed can directly impact sales. Slow-loading pages can deter potential customers. Tools like Google PageSpeed Insights can provide insights into your site’s performance and offer optimization suggestions.
Testing is an ongoing process. Even after your store goes live, regular testing is essential to ensure that updates or new features don’t introduce new issues. Consider using tools like the Magento Functional Testing Framework for automation, which can significantly reduce testing time and ensure more consistent results.
Market Your Magento 2 Beverage Store
Merely setting up your Magento 2 beverage store isn’t enough. You need to market it effectively to stand out and attract more customers. With the right marketing approach, you can enhance brand awareness and boost sales for your Magento 2 beverage store. Here’s a comprehensive guide to marketing your Magento 2 beverage store:
Key eCommerce Marketing Channels:
1. Social Media Marketing (SMM)
Social media platforms like Facebook, Instagram, and Twitter (now X) are indispensable tools for promoting your beverage products. One innovative technique is the use of shoppable posts, allowing customers to make purchases directly from social media platforms. This bridges the gap between browsing and buying, making the shopping experience seamless.
2. Content Marketing
Content marketing involves creating and distributing relevant and engaging content to attract and educate your target audience. This could be through blogs, landing pages, podcasts, or even print publications. For the beverage industry, sharing recipes, the history of certain drinks, or the health benefits of specific beverages can be a great way to engage with customers.
3. Search Engine Optimization (SEO)
SEO is vital for any online store. It involves optimizing your website to rank higher on search engines. When people search for beverages or related keywords, a well-optimized site will appear higher in the search results, driving more organic traffic to your store.
4. Pay-per-click (PPC)
PPC marketing involves paid ads on search engines. Platforms like Google Ads ensure that your advertisements appear at the top of search engine results, increasing visibility. While PPC can be costlier than other methods, it guarantees that your products reach a specific target audience.
5. Email Marketing
Email marketing remains a powerful tool for eCommerce. From promotional offers to newsletters, a well-crafted email can drive sales and enhance customer loyalty. For beverage stores, consider sending out emails about new product launches, special discounts, or even fun beverage-related trivia.
6. Video Advertising
With the increasing consumption of video content online, video advertising is a must. This could be in the form of product demonstrations, customer testimonials, or even fun, beverage-related content. Videos can boost engagement and drive more organic visitors to your site.
7. Affiliate Marketing
Affiliate marketing involves partnering with influencers or bloggers who promote your products and get a commission for every sale made through their referral. This method can quickly drive traffic to your store without any upfront costs.
8. Personalization
Personalization enhances the shopping experience. By analyzing customer behavior and past purchases, you can offer tailored product recommendations, making shopping more intuitive and enjoyable.
9. Upselling
Upselling involves encouraging customers to purchase a more expensive or upgraded version of a product. For beverage stores, this could mean suggesting a premium version of a drink or a combo pack.
10. Loyalty Programs
Loyalty programs reward repeat customers. Whether it’s through points, discounts, or exclusive offers, these programs can boost customer retention, increase sales, and encourage more purchases.
Bottom Line
In this guide, we’ve walked through the comprehensive steps to launch a beverage store on Magento 2. We’ve covered the essentials, from understanding why Magento 2 stands out as the preferred choice for e-commerce to exploring the setup process. We also touched upon the importance of legal compliance, ensuring a smooth customer experience, and the pivotal role of marketing in driving success. Having a robust platform like Magento 2 can set your beverage store apart. With this knowledge, you’re better prepared to navigate the e-commerce waters and establish a successful online beverage business.

How to Launch Your Beverage Store on Magento 2 in 2023