Linux systems are often perceived as being more secure than other operating systems, but they are not immune to malware attacks. In recent years, there has been a significant increase in the number of malware threats targeting Linux platforms.
According to the Atlas VPN team, based on AV-ATLAS.org statistics, the number of new Linux malware reached record highs in 2022, with nearly 1.7 million samples discovered. Compared to 2021, new Linux malware numbers have soared by an astonishing 650 percent. This is due to the growing popularity of Linux in both enterprise and consumer environments.
Malware can cause a variety of problems for Linux systems, including:
- Data theft and corruption
- System downtime and performance degradation
- Denial-of-service attacks
- Backdoors for unauthorized access
There are a variety of malware scanning tools available for Linux systems, each with its own strengths and weaknesses. Some tools are designed for general-purpose malware scanning, while others are specialized for detecting specific types of malware, such as rootkits or viruses. The best malware scanning tool for you depends on your needs and requirements. This article aims to guide you through some of the best malware scanners for Linux in 2023, aiding in malware remediation.
Why Linux Systems Need Malware Scanners
Common Misconception: Linux Systems are Immune to Malware
There is a common misconception that Linux systems are immune to malware. This belief stems from the fact that Linux is an open-source operating system, which means that its code is freely available for review and modification by a large community of developers. This community-driven approach to development can lead to the quick identification and patching of vulnerabilities, thereby enhancing the security of Linux systems.
However, the open-source nature of Linux does not inherently make it immune to malware. In fact, the popularity of Linux has led to increased attention from cybercriminals. As Linux continues to grow in market share, there has been a corresponding increase in malware and cyber threats targeting Linux servers and workloads.
The Need for Protection on Linux Systems
Despite the inherent security features of Linux, it is not invulnerable to threats. Vulnerabilities still exist and can cause significant damage if proper prevention and security best practices are not implemented. Cybercriminals are increasingly targeting Linux systems to steal information, install malicious files, and even take control of systems.
There are a number of reasons why Linux systems need protection from malware:
- Linux systems are increasingly being used in enterprise environments. As a result, they are becoming more attractive targets for attackers.
- Linux systems are often used to host critical infrastructure, such as web servers and databases. If this infrastructure is compromised, it can have a devastating impact on businesses and organizations.
- Linux systems are often used by home users to store sensitive data, such as financial information and personal photos. If this data is stolen, it can be used for identity theft or other fraudulent activities.
How to Choose a Malware Scanner for Linux
System Compatibility and Requirements
When choosing a malware scanner for Linux, it is important to consider the compatibility of the scanner with your system. Some malware scanners are only compatible with certain versions of Linux or with certain hardware platforms. It is also important to consider the system requirements of the scanner. Some malware scanners can be quite resource-intensive, so you must ensure that your system has enough resources to run the scanner without impacting its performance.
Types of Malware Detection and Removal Capabilities
Different malware scanners have different malware detection and removal capabilities. The malware scanner should be able to detect and remove various types of malware, such as viruses, worms, trojans, ransomware, spyware, rootkits, and more. It should also offer real-time protection, on-demand scanning, quarantine, and disinfection options. You should also look for features such as heuristic analysis, behavioral monitoring, sandboxing, and cloud-based scanning that can enhance the detection and removal of malware.
Community Support and Updates
It is important to choose a malware scanner that has a good community of users and developers. This will ensure that the scanner is actively being maintained and updated with the latest malware definitions. It is also important to choose a malware scanner with a vendor that provides good support. You should also check the frequency and quality of the updates, as well as the availability of documentation, tutorials, forums, and customer service.
Pricing and Licensing Options
Malware scanners can vary in price from free to hundreds of dollars. It is important to choose a malware scanner that fits your budget. The malware scanner should offer a fair and transparent pricing model that suits your budget and needs. You should also consider the licensing options, such as free, freemium, trial, subscription, or one-time purchase. You should also compare the features and benefits of different plans or packages offered by the malware scanner.
Additional Criteria to Consider
In addition to the criteria listed above, there are a few other things to consider when choosing a malware scanner for Linux:
- Usability: Some malware scanners can be complex to use, while others are very user-friendly. It is important to choose a scanner that is easy to use, even for users with limited technical knowledge.
- Performance: Some malware scanners can impact the performance of your system, while others have a negligible impact. It is important to choose a scanner that has a good balance of performance and security.
- Features: Some malware scanners come with additional features, such as real-time protection, email scanning, and web filtering. It is important to consider which features are important to you and to choose a scanner that has those features.
How Malware Scanners Work in Linux
Malware scanners in Linux work by using a variety of techniques to detect and remove malware from your system.
- Installation: The first step is to install the malware scanner on your Linux server using a package manager command like s
udo apt install clamavorsudo apt install chkrootkit, depending on your vendor. - Database Update: After installation, the malware scanner needs to update its database to ensure it can detect the latest threats. This is typically done through a specific command.
- System Scan: Once the database is updated, the malware scanner begins scanning your system. It checks files and system binaries against its database of known malware signatures (signature-based detection). It may also analyze the behavior of files to detect new or unknown threats (heuristic analysis).
- Threat Detection: If a file or behavior matches an entry in the malware database, it’s flagged as a potential threat. The scanner logs this information for further analysis.
- Threat Removal or Quarantine: Once threats are identified, the scanner takes action based on its settings. It might remove the threat from your system or move infected files to a quarantine area where it can’t cause harm.
- Real-Time Malware Protection: Some scanners also offer real-time protection, continuously monitoring your system for malicious activity and taking immediate action when a threat is detected.
- Regular Updates and Scans: To maintain effective protection, it’s important to regularly update the malware scanner’s database and perform system scans.
Review of Top Malware Scanners for Linux in 2023
1. Lynis
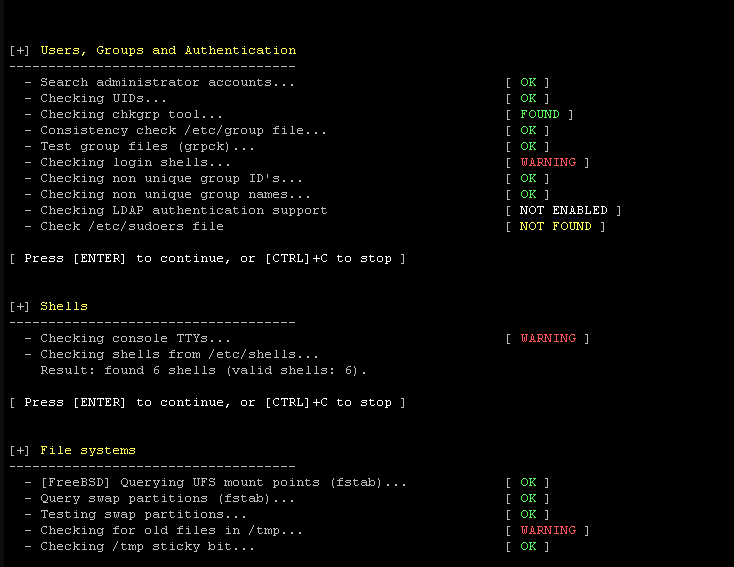
Lynis is a battle-tested security tool designed for systems running Linux, macOS, or Unix-based operating systems. It has been available as open-source software under the GPL license since 2007. With the main aim of ensuring system security, Lynis performs an array of security control checks during its scan. It is capable of identifying installed software and possible configuration flaws, thus making it an invaluable asset for system and network administrators, security specialists, auditors, and penetration testers.
Features and Benefits
Lynis offers a range of features that make it a robust choice for enhancing the security of your Linux system:
- Extensive Security Auditing: Lynis performs a variety of security control checks, covering areas such as system binaries, boot loaders, kernel configurations, memory and process checks, authentication setups, file systems, network configurations, and many more.
- Vulnerability Scanning: Lynis is a passive vulnerability scanner, meaning it doesn’t actively probe your system, resulting in clean log files. The scans are in-depth and can detect areas undiscovered by normal vulnerability scanners.
- System Hardening: Lynis provides ready-to-use code snippets that can be used to harden your system.
- Software Auditing: It also provides auditing features for different software, such as database servers (MySQL, Oracle, PostgreSQL), web servers (Apache, Nginx), and many other system tools.
- Intrusion Detection: Lynis can detect traces of intrusion, providing an additional layer of security.
- Central Administration: Lynis gathers all security-related information in one place, making your data just a few mouse clicks away.
- Customized Action Plan: Lynis measures your environment and helps you decide where to start first. You stay in control while getting proper guidance.
- Reporting: Lynis offers ready-to-use reports to show the status of your environment.
- Security Dashboard: Lynis provides a security dashboard that gives you an overview of your environment at a glance.
- Continuous Monitoring: With continuous monitoring, you can keep improving your security over time.
Pricing
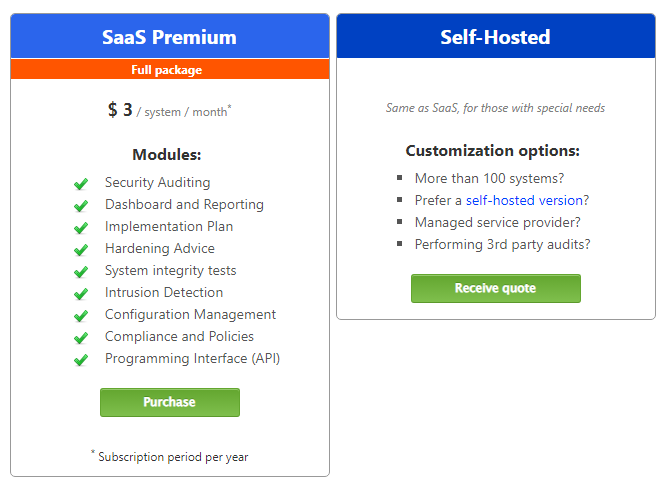
Lynis is Free and Open Source Software (FOSS). However, for enterprise users, there’s Lynis Enterprise. The SaaS Premium Full package costs $3 per system per month. For those with special needs or more than 100 systems, customized options are available.
How to Install and Use Lynis
Sure, here’s a more detailed guide on how to install and use Lynis:
Step 1: Download and Installation There are several options to obtain Lynis. You can choose the option you are most familiar with.
- Package: Installing Lynis via a package manager is one option to get started with Lynis. For most operating systems and distributions, a port or package is available. For example, if you’re using Ubuntu, you can install Lynis with the following command:
sudo apt-get install lynisIf you’re using CentOS, you can use the following command:
yum install lynis- If you are using Git, start by selecting the parent directory before cloning the project. Git will then create a ‘lynis’ subdirectory with the full program in it.
cd /usr/local
git clone https://github.com/CISOfy/lynis
cd lynis- Direct download: The latest stable version of Lynis, as a normal download. Good match for AIX, HPUX.
mkdir -p /usr/local/lynis
cd /usr/local
wget https://cisofy.com/files/lynis-latest.tar.gz
tar -xvf lynis-latest.tar.gz
rm lynis-latest.tar.gz- Homebrew (macOS): This is a great choice for users of macOS to install Lynis and keep it up-to-date.
Step 2: First Run After the installation, it is time to run Lynis for the first time.
Step 3: Report and Logging Lynis will perform a security scan of your system and generate a report.
For more detailed instructions, please refer to the official Lynis documentation.
2. Chkrootkit

Chkrootkit is a highly regarded malware scanner designed specifically for Linux systems. It is a locally executed tool that searches for signs of rootkits, a form of malware that exploits security flaws to gain unauthorized access to a computer or its services. Rootkits are particularly malicious as they can remain hidden on a system while providing remote control capabilities, disrupting security software, and leaking valuable data.
Features and Benefits
Chkrootkit is composed of multiple components, each designed to detect different aspects of rootkit behavior on a system. Some of the key features include:
- chkrootkit: A shell script that checks system binaries for rootkit modification.
- ifpromisc.c: Checks if the network interface is in promiscuous mode.
- chklastlog.c: Checks for lastlog deletions.
- chkwtmp.c: Checks for wtmp deletions.
- chkproc.c: Checks for signs of Loadable Kernel Module (LKM) trojans.
These features work together to comprehensively scan the system, identifying potential threats swiftly and meticulously.
The benefits of using Chkrootkit are numerous. It offers swift scanning capabilities, ensuring rapid and meticulous system scans to identify potential threats swiftly. It employs advanced detection mechanisms, using signature-based detection and heuristic analysis to uncover concealed rootkits and other malicious software. After each scan, Chkrootkit produces comprehensive reports highlighting potential vulnerabilities and detected anomalies. This detailed information aids in distinguishing between legitimate system files and potential threats.
Moreover, Chkrootkit can identify signs of over 70 different rootkits, making it an incredibly versatile tool. However, it’s important to note that while Chkrootkit is an excellent first line of defense, it cannot guarantee a system is uncompromised. Human judgment and further investigation will always be needed to ensure the security of your system.
Pricing
Chkrootkit is an open-source tool, which means it’s freely available for use. There are no associated costs or subscription fees.
How to Install and Use Chkrootkit
Installation
Ubuntu and Debian
Chkrootkit is available in the default repositories of Ubuntu and Debian. You can install it using the following command:
sudo apt-get install chkrootkitCentOS
For CentOS, you’ll need to download and compile the source code. Here are the steps:
- Download the Chkrootkit source code.
- Extract the Chkrootkit source archive.
- Compile and install Chkrootkit.
Kali Linux
For Kali Linux, you can clone the Chkrootkit repository and run the tool directly. Here are the steps:
git clone https://github.com/Magentron/chkrootkit.git
cd chkrootkit
ls
Usage
Once installed, you can start scanning your system for rootkits with the following command:
sudo chkrootkitIf you want to look for suspicious strings, use the -x option:
sudo chkrootkit -x | lessYou can also specify a path for the external commands used by Chkrootkit. For example, if you have trusted binaries in /mnt/safe, you can use them with the -p option:
sudo chkrootkit -p /mnt/safe3. Rkhunter
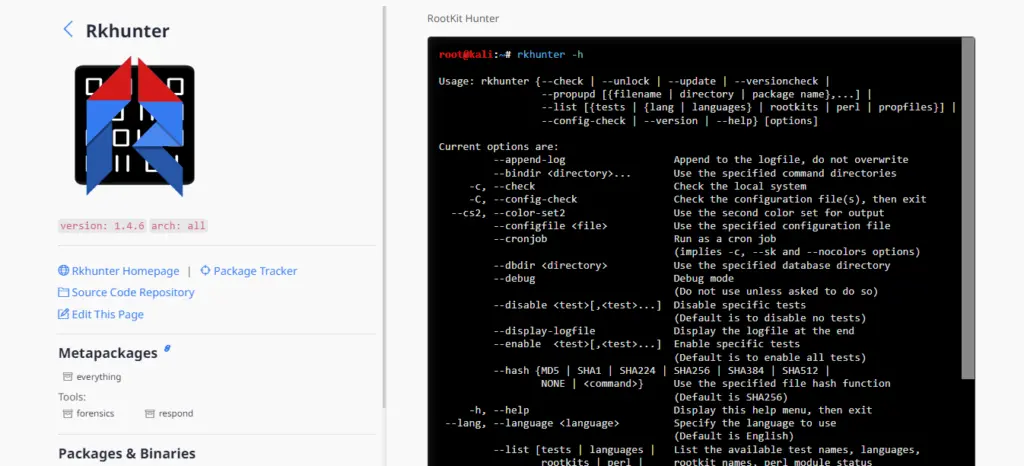
Rkhunter, also known as Rootkit Hunter, is a highly regarded open-source tool that scans systems for known and unknown rootkits, backdoors, sniffers, and exploits. It is designed for POSIX-compliant systems and can be run on most UNIX-based systems. Rkhunter is written in Bash, allowing for portability across different systems.
Features and Benefits
Rkhunter offers a comprehensive suite of features to ensure robust system security:
- Rootkit Detection: It scans systems for known and unknown rootkits.
- Backdoor Detection: Rkhunter identifies potential backdoors that may compromise system security.
- Sniffer Detection: It detects sniffers that might be capturing and analyzing network traffic.
- Exploit Detection: Rkhunter checks for exploits that could be used to gain unauthorized access to the system.
- File Change Monitoring: It monitors SHA256 hash changes of important files.
- Permission Verification: The tool checks executables for anomalous file permissions.
- Kernel Module Inspection: Rkhunter looks for suspicious strings in kernel modules.
- Hidden File Detection: It identifies hidden files in system directories.
- File Scanning: Rkhunter can optionally scan within files.
Rkhunter provides several benefits to its users:
- Comprehensive Security Check: By checking for rootkits, backdoors, sniffers, and exploits, Rkhunter provides a thorough security check for your system.
- Early Threat Detection: By monitoring file changes and inspecting kernel modules, it can detect potential threats early before they cause significant damage.
- Ease of Use: Rkhunter can be easily installed and run from the command line or as a cron job.
- Portability: As it is written in Bash, it can be used across different UNIX-based systems.
Pricing
Rkhunter is an open-source tool, which means it’s free to use. You can download the latest version from its official website or install it directly from the repository of your Linux distribution.
How to Install and Use Rkhunter
Here’s a step-by-step guide on how to install and use Rkhunter on your Linux system.
Step 1: Update Your System
Before installing any new software, it is crucial to update your system. Run the following commands to update your package list and upgrade the installed packages:
sudo apt update
sudo apt upgrade
Step 2: Install Rkhunter
Rkhunter is available in the official Ubuntu repositories. You can quickly install it using the following command:
sudo apt install rkhunterStep 3: Update Rkhunter Data Files
To get the latest malware definitions and improve the accuracy of Rkhunter scans, update the data files using the following command:
sudo rkhunter --updateStep 4: Configure Rkhunter
To configure Rkhunter, edit its configuration file located at /etc/rkhunter.conf. You can use any text editor, such as Nano or Vim, to edit the file:
sudo nano /etc/rkhunter.confHere are some recommended configurations:
- Enable automatic updates by uncommenting and setting UPDATE_MIRRORS to 1:
UPDATE_MIRRORS=1- Configure the download mirrors by uncommenting and setting MIRRORS_MODE to 0:
MIRRORS_MODE=0- Enable email notifications by uncommenting and setting MAIL-ON-WARNING with your email address:
MAIL-ON-WARNING="youremail@example.com"Save and close the file once you have made the necessary changes.
Step 5: Run a System Scan
To run an initial system scan, execute the following command:
sudo rkhunter --check --skip-keypressThis command will run Rkhunter with a check option, scanning your system for potential threats. The –skip-keypress flag avoids the need for pressing a key after every test. Once the scan is complete, you can view the results in the log file at /var/log/rkhunter.log.
Step 6: Schedule Regular Scans
To automate regular scans, you can create a cron job. Edit the crontab with the following command:
sudo crontab -eAdd the following line to schedule a daily scan at 3:00 AM:
0 3 * * * /usr/bin/rkhunter --check --cronjob --report-warnings-onlySave and close the file.
4. Bitdefender GravityZone

Bitdefender GravityZone is a comprehensive cyber security platform built from the ground up for virtualized and cloud environments, offering high performance and protection while delivering centralized management, easy deployment, and the freedom to choose between a cloud or an on-premise hosted management console.
Features and Benefits
GravityZone incorporates key security functions required to enhance cyber-resilience:
- Risk Assessment & Mitigation: Understand the cybersecurity risks associated with endpoint configuration and user actions.
- Threat Prevention: Over 99% of all threats are stopped by prevention technologies.
- Advanced Attacks Detection: Enhanced threat detection and visibility that enables the strengths of XDR for protecting endpoints.
- Security Incident Response: Automatic and guided incident response for fast containment of the attack.
- Unified Endpoint Security and Analytics: GravityZone relies on a single console/single-agent architecture with both cloud (Software as a Service) and on-premises deployment options.
Bitdefender GravityZone offers several benefits:
- Comprehensive Security Check: By checking for rootkits, backdoors, sniffers, and exploits, GravityZone provides a thorough security check for your system.
- Early Threat Detection: By monitoring file changes and inspecting kernel modules, it can detect potential threats early before they cause significant damage.
- Ease of Use: GravityZone can be easily installed and run from the command line or as a cron job.
- Portability: As it is written in Bash, it can be used across different UNIX-based systems.
Pricing
The pricing for Bitdefender GravityZone starts at $258.99 per year. However, prices may vary depending on the number of devices you want to protect. For more than 100 devices, you may need to submit an inquiry to Bitdefender.

How to Install and Use Bitdefender GravityZone on Linux
Bitdefender GravityZone is a comprehensive cybersecurity platform that provides robust protection for Linux systems. Here’s a step-by-step guide on how to install and use Bitdefender GravityZone on your Linux system.
Step 1: Access the GravityZone Console
Log in to the Bitdefender GravityZone console using your enterprise credentials.
Step 2: Download the Installation Package
From the console, navigate to the “Network” section and select “Packages”. Select the installation package from the list. Click the “Download” button at the upper side of the page and select the Linux kit (32-bit or 64-bit, according to your virtual machine OS type).
Step 3: Transfer the Downloaded Archive
Transfer the downloaded archive to the target virtual machine using, for example, an SSH client or through a SAMBA share.
Step 4: Unpack and Run the Installer
Open a terminal session on the Linux virtual machine using an account with administrative privileges. Run the following commands to unpack and run the installer:
cd /root
tar –xvf fullKit_unix64.tar
chmod +x installer
./installer
Note: The cd /root command is an example for specifying the virtual machine folder where you have transferred the downloaded installation archive. The package name mentioned above is also an example. You must enter the name of the specific package you have downloaded.
Step 5: Verify Installation
To check that Bitdefender GravityZone has been installed on your system, run this command:
service bd statusIn a few minutes after Bitdefender GravityZone has been installed, your system will show up as managed in the GravityZone network inventory.
5. ClamAV
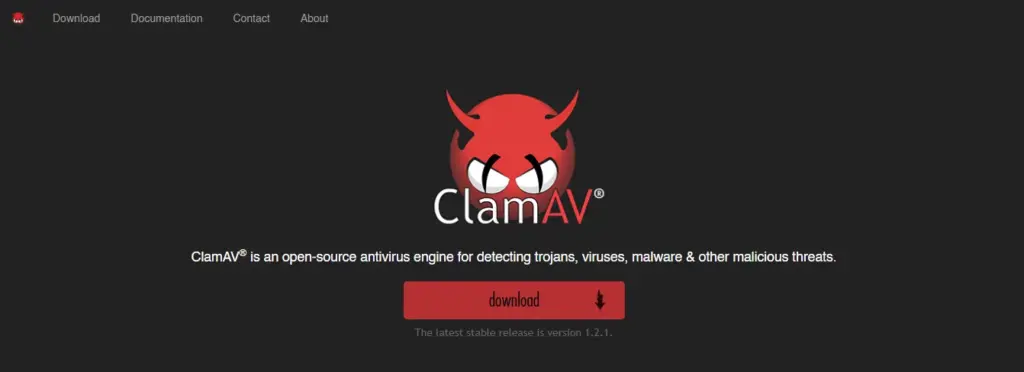
ClamAV is an open-source antivirus engine used in a variety of situations, including email and web scanning and endpoint security. It is compatible with various operating systems, including Linux, Windows, and Mac. Despite being a good free antivirus for Linux, it offers a range of features that make it a robust and reliable choice for users.
Features and Benefits
ClamAV provides a number of utilities:
- Multi-threaded scanner daemon: This allows for efficient and fast scanning.
- Command-line scanner: This provides flexibility for on-demand file scanning.
- Automatic database updates: This ensures that the antivirus is always up-to-date with the latest threats.
- Real-time protection (Linux only): The ClamOnAcc client for the ClamD scanning daemon provides on-access scanning on modern versions of Linux.
- Detection capabilities: ClamAV can detect millions of viruses, worms, trojans, and other malware, including Microsoft Office macro viruses, mobile malware, and other threats.
- Bytecode signature runtime: Powered by either LLVM or a custom bytecode interpreter, this allows the ClamAV signature writers to create and distribute very complex detection routines and remotely enhance the scanner’s functionality.
- Signed signature databases: This ensures that ClamAV will only execute trusted signature definitions.
- Archive scanning: ClamAV scans within archives and compressed files but also protects against archive bombs.
Pricing
ClamAV is an open-source tool which means it’s free to use.
How to Install and Use ClamAV on Linux
Debian and Ubuntu-Based Distributions
To install ClamAV on Debian and Ubuntu-based distributions, you can use the following commands:
sudo apt update
sudo apt install clamav clamav-daemon
Fedora Workstation
For Fedora workstation, use the following commands:
sudo dnf install clamav clamd clamav-update -yArch Linux
On Arch Linux, use the following command:
sudo pacman -S clamavCentOS, Redhat, Fedora, SUSE, etc.
For RPM-based Linux distributions running glibc version 2.17 or newer, you can download the package for your system and use yum or dnf to install the package. For example:
sudo dnf install ~/Downloads/clamav-0.104.0-rc2.linux.x86_64.rpmYou can verify that the package was installed using:
dnf info clamavSetting Up ClamAV
Once the installation is finished, you have to update its signature database manually. You can do so by typing the following commands in your Terminal:
# Stop the freshclam service
sudo systemctl stop clamav-freshclam

# Update your database
sudo freshclam
Scanning for Viruses using Clamscan
You can scan for malware on your system by typing the following command:
sudo clamscan -r -i /FOLDER/PATHIn the above command, the -i option tells the clamscan command only to report if any file inside a directory is infected, and the -r option tells it to scan the specified directory recursively.
You also have the option to save a scan report to a file. You can do that by typing the command like this:
sudo clamscan -ir /bin/ -l report.txtRemember always to keep your antivirus software up-to-date to ensure optimal protection against the latest threats.
6. Linux Malware Detect (LMD) – Bonus
Linux Malware Detect (LMD) is a robust malware scanner designed specifically for Linux systems. It is an open-source software project released under the GNU GPLv2 license. The primary focus of LMD is to combat threats faced in shared-hosted environments.
Features
LMD boasts a range of features that make it a powerful tool in the fight against malware:
- MD5 File Hash Detection: LMD uses MD5 file hashes for quick threat identification.
- HEX-Based Pattern Matching: This feature aids in identifying threat variants.
- Statistical Analysis Component: LMD employs statistical analysis to detect obfuscated threats, such as those encoded in base.
- Integration with ClamAV: LMD can use ClamAV as a scanner engine, which improves performance.
- Threat Data Extraction: LMD uses threat data from network edge intrusion detection systems to extract malware actively used in attacks and generate signatures for detection.
- User Submissions and Community Resources: Besides network edge intrusion detection systems, LMD also derives threat data from user submissions and malware community resources.
Pricing
As an open-source project, Linux Malware Detect is available free of charge.
Bottom Line
The malware scanners dissected in this article—Lynis, Chkrootkit, Rkhunter, Bitdefender GravityZone, ClamAV, and Linux Malware Detect (LMD)—represent a vanguard of cybersecurity solutions adept at fortifying Linux environments against a myriad of cyber threats.
Each of these tools brings to the table a unique blend of features, capabilities, and ease of use:
- Lynis excels in system auditing and vulnerability detection, providing a clear roadmap for bolstering system security.
- Chkrootkit shines in unmasking stealthy rootkits that seek to burrow deep into system internals.
- Rkhunter further amplifies rootkit detection with its extensive signature base and heuristic analysis.
- Bitdefender GravityZone emerges as a comprehensive security suite offering a gamut of protection mechanisms from a cloud-based platform, ensuring real-time threat intelligence and response.
- ClamAV offers an open-source avenue for continuous vigilance against malware, with a strong emphasis on signature-based detection.
- Lastly, Linux Malware Detect (LMD) provides a specialized focus on detecting malware targeting Linux systems, showcasing its prowess in identifying and mitigating threats native to the Linux ecosystem.
The installation and utilization of these tools are fairly straightforward, with ample documentation and community support to aid both seasoned administrators and newcomers to Linux security management.
Selecting the right malware scanner hinges on the specific needs and operational dynamics of your environment. A layered approach, employing multiple scanners in tandem, could offer a more rounded defense, casting a wider net to catch elusive threats.
Remember always to keep your malware scanners updated and run regular scans to ensure a secure and smooth Linux experience.


6 Best Malware Scanners for Linux in 2023